Everbridge University
| .net | .eu |
|
|
|
-
Click here to download the Everbridge Suite User Guide, January 2026.
-
Topic
Emergency Live Operator (ELO) in Everbridge 360™.
Description
The Emergency Live Operator service is a top-priority phone queue provided to help you send critical Notifications if you cannot access the Everbridge interface directly. Five Emergency Live Operator messages are available per year without any additional cost.
ELO may be used to initiate a Notification, Incident or Scenario in Everbridge 360™.
NOTE: A Wireless Emergency Alert (WEA) cannot be sent via ELO since IPAWS credentials cannot be shared with anyone including Technical Support. If you cannot access the Everbridge interface directly and need to send a WEA message, contact FEMA IPAWS support.
Listed here are the steps an emergency live operator agent will follow to initiate a notification, incident, or scenario.
Everbridge emergency live operator calls, on average, take 10 minutes; less if the outgoing message is created in advance.
The emergency live operator service is available 24x7x365.Global Direct Emergency Live Operator: +1 818-230-9797 U.S. & Canada Toll-Free: 877-220-4911 United Kingdom Toll-Free: 0800-0988-273 Germany Toll-Free: 0800-181-9027 France Toll-Free: 0-805-08-06-13 Spain Toll-Free: 900-83-88-75 When initiating an Emergency Live Operator call, the agent will require the following information from the user:
-
- Username
- The correct answer to your security question.
NOTE: You will never be asked for your password. Your security question and answer can be accessed and updated via the manager portal: click on your username from the upper right, then select Change Security Question. - The organization and role that you would like to send the message from.
- If sending an incident, scenario, or notification template, the title of the template or Scenario.
- When creating a new notification, the following information will need to be provided: The title of the message The body of the message The type of message (standard, polling, or conference bridge) The names of the groups and/or individual contacts to send the message to. If confirmation should be set to yes or no.
Before calling the emergency line, please make sure you have the information ready. When you call, speak loudly and clearly so the operator can understand you.
Script
Below is the script used by our Technical Support team, this is what is expected during an emergency live operator call.
- “Emergency live operator, what is your username?” - The agent will identify you by username or first name and last name.
- “Can I have a callback number in case our call is disconnected?”
- “For authentication purposes, please can I have the answer to your security question?” - To be granted access to send communications, you must provide the correct security question answer. The agent will read the question to you.
- “Please confirm the name of the organization to send the message from” - If multiple organizations are available to the user, specify the organization to be used.
- “Please confirm the role that you wish to send the message from” - If multiple roles are available to the user, specify the role to send the message from.
- “Are we sending a Communication, Notification, Incident, or scenario?"
Communication
-
- "Can you confirm the type of Event you would like to send?”
- "Are we choosing no template, or is there a specific template?" - A template can be sent immediately or a no template will prompt the agent to proceed with a new notification created via the communications workflow.
Notification
-
- "Are we sending a new notification or a template?" - When sending a notification template, the notification can be sent right away. Otherwise, a new notification can be created with the agent.
Template
-
-
- "Can I have the title of the Template." "Does any of the settings or text need to be updated?" - If nothing is required to be updated in the template, the agent will ask if you wish to send the template now or schedule for later.
-
New Notification
-
-
- "Is there an imminent threat to life?" - Imminent threat to life should only be used when there is a threat of loss of life.
- "Will this be a high-priority message?" - High-priority messages are given priority in your delivery queue and are flagged in the recipients' inbox.
- "Can I have the title of the message that you wish to send?" "Can I have the body of the message that you wish to send?" - The agent will always read the title and the body of the message back and may confirm capitalization and spellings.
- "Would you like to send a standard, polling, or conference bridge?" - The agent will need to confirm the polling answers or bridge that you wish to launch.
- "Can you confirm the names of the groups and/or individual contacts and/or rules to whom you wish to send the message?" - If sending to a group or rule, the agent will confirm the number of contacts to ensure the amount is correct.
- "Would you like your members to confirm receipt of the message?" - You have the option to have your message delivered to devices with or without confirmation request.
- "Are you happy to proceed with the default delivery methods, or would you like to change these?" - The agent will identify the message delivery methods available (home phone, cell phone, email, etc.) and ask to confirm which delivery methods should be included.
- “Please confirm if you are happy to proceed with the default settings, alternatively would you like me to change any of the settings?" - The agent can update any of the default notification settings with you, such as the broadcast duration, the number of message cycles, etc.
- "Would you like this message now or schedule for later?" - The agent will confirm the message and title before asking if you would like to send or schedule the notification. Once sent the broadcast ID number will be provided and a copy of the details emailed to you.
-
Incident
-
- "Can you confirm the title of the incident template?"
-
"There are some available variables to be selected, please confirm the following"
- If any variables are available to be edited before clicking
next, the agent will confirm these with you.
- Not all incident templates have permission for the notification to be changed before it is sent.
- If the Incident template cannot be changed, the agent will confirm before sending it.
- If the template can be changed, the agent will confirm the default details, and ask if anything requires changing.
- "Would you like this message now or schedule for later?" - The agent will confirm the entire message before asking if you would like to send or schedule the notification and provide the message broadcast ID number for tracking purposes and follow up with an email.
Scenario
-
- "Can I have the title of the scenario"
- "There are some available variables to be selected, please can you confirm the following..." - If any variables are available to be edited before the scenario is sent, the agent will confirm these with you.
- "To confirm, the variables have been set to '...'. Are you happy for me to send the scenario? " - Scenarios cannot be edited before being sent or scheduled for later. Once the scenario has been sent, the agent will confirm the message broadcast ID(s) with you and follow up with an email.
NOTE: As a security precaution, the emergency live operator agent does not have access to passwords and will never ask you to provide your password. The emergency live operator agent can only initiate, cancel, and check the status of notifications and incidents.
For authentication purposes, the agent will ask for the answer to the security question. The security question is the same as the password reminder that was created at the time of registration.
The security question and answer can be accessed and updated via the manager portal: click on the user profile from the upper right, then select Change Security Question. Here the answer and question can be viewed.The emergency live operator service is a top-priority phone queue provided to help you send critical notifications if you cannot access the Everbridge interface directly, and 5 emergency live operator messages are available per year without any additional cost.
-
-
Question
What is Everbridge 360™?
Answer
Everbridge 360™ is the new Critical Event Platform by Everbridge to respond faster with greater accuracy to Events that matter to People and Assets. Everbridge 360™ is one platform for enterprise resilience for all organizational roles. It is designed to allow effortless experience across all Everbridge product lines. Everbridge 360™ includes a refreshed user interface, a left-side navigation menu, and a unification of the user experience across the Everbridge Manager Portal and the Visual Command Center (VCC).
The First Release of Everbridge 360™ Includes
- Combined collapsible left-side Apps Menu to allow for seamless navigation across all applications and modules. See knowledge article Everbridge 360™: Left-Side Applications Navigation Menu.
- New Event Types with predetermined event categories based on risk intelligence feeds with the ability to create custom event types to link together events, alerts, and templates, decreasing the mean time to communicate. See knowledge article Everbridge 360™: Event Types.
- New Communications Workflow, combining the best of both worlds between Notifications and Incidents, with new feature enhancements to optimize the launch process, reduce training time, reduce the opportunity for errors, and help mitigate the “fear of sending out.” See knowledge article Everbridge 360™: Communications Workflow.
- Everbridge 360™ Apps - Mobile & Desktop. See knowledge article Everbridge 360™: Everbridge 360™ App Mobile & Desktop.
The Benefits of Everbridge 360™ Include
Refreshed User Interface
- Revamped interface to be more visually appealing, intuitive, and user-friendly.
- Optimized design to make navigation easier and streamline interactions.
Simplified Workflows
- Simplified communications workflow to reduce complexity and accomplish tasks faster and more straightforward.
Event Configuration
- Configure customized events for the Organization as well as utilize Everbridge-defined event categories.
Improved Platform Experience
- Seamless user experience to transition between Visual Command Center and Everbridge Suite.
Feature Enhancements
- New features to communicate faster and reduce the opportunity for errors. Optimized features to improve overall usability and facilitate quicker onboarding.
-
Table of Contents
- Contact Integration
- Everbridge Contact Sync Overview
- Introduction
- Methodology Decision Tree
- Individual Contact Sync
- File Upload
- Getting File Upload Working
- File Upload Common Questions
- Contact Uploads Help
- Resources
Contact Integration
If you use any of the following systems for maintaining your contacts, Everbridge recommends using our Contact Integration solution for loading and maintaining contacts in Everbridge.
- Dayforce Report
- Microsoft Entra ID (Azure AD)
- Oracle HCM
- ServiceNow
- UKG Pro
- Workday API
- Workday Report
If you do not use one of the above systems, please read on to select which option (Contact Synchronization or SFTP file upload) is most suitable for your Organization.
Everbridge Contact Sync Overview
One of the first things to consider when using the Everbridge platform is how to get your information into the system. This document focuses specifically on getting your contact data in. In this case contact data is all data associated with delivering messages to people.
In general, we recommend getting your contact data into the Everbridge cloud platform using a simple CSV Replace file.
What is a CSV Replace file and why is this recommended?
A CSV file in the most basic terms is a simple comma delimited file (you can even read it in Excel). You just need to export your people from your existing HR system (or any system of record) into the Everbridge format and upload it.
Common questions answered in this document:
- How do I handle deletes?
- I have 50,000 records; do you really expect me to load them all into your system ever day/week?
- I do not want to do this manually; can this be automated?
Where do I start?
To migrate your contact data into Everbridge we recommend you start with your IT or HR Department. They usually have some “System of Record” that has a list of all people you will need to load into Everbridge. When you find the IT or HR person ask them, “If something goes with your system who do you contact?” Chances are that is the person who will be able to help you extract the data or at least point you in the right direction. If you find the right person, your next steps will be to work with your Everbridge implementer to map out how your Everbridge system should be set up based on the information available.
I want to update my contacts in real time.
After taking a deeper look into real time contact sync, most customers opt to use SFTP file upload.
Introduction
Purpose
The one activity common to ALL implementations of the Everbridge platform is the use of contact data. There is a lot of confusion out there about the best way to get your contact information into Everbridge. Unfortunately, there is no magic data wand that will perfectly sync your data with Everbridge.
We all know Everbridge has the world’s greatest delivery engine (just ask our sales and marketing teams), but to use it, you first need to get your information into the system. It is also advisable to keep it updated; but one step at a time.
How do you get your information into Everbridge?
Luckily for you, the engineers at Everbridge have given this a lot of thought and have come up with a few different ways. This document explains your options and will help you decide the correct option for you and all your data needs.
When you are done reading this document, you should have a much better idea of how to keep your contacts.... wait for it... *N Sync.
Overview
The most common misconception in the world of Everbridge contact syncing is that you have two main options: SFTP or API. This is NOT how you want to think about it. The two main ways to sync your contacts are really:
- File Upload
- Individual Contact Sync
We are going to say this again because it is the most common mistake made when talking about getting contact information into Everbridge. Your two main options are File Upload or Individual Contact Sync.
Sometimes we get asked the question: “Can Everbridge extract(pull) data from a customer system?” The quick answer is no. The long answer is that the Everbridge infrastructure is just not designed to handle pulling data into its environment. To create a mechanism that will extract data from a third party and pull it into Everbridge would require a whole new framework and a working knowledge of the customer system.
Other Considerations
- In general, Everbridge should not be used as a SOR (System of Record).
- Try to use a version of the KISS principle (Keep It Simple and Stupid).
Methodology Decision Tree
Using the Decision Tree
You can use a decision tree to decide what methodology to use to get your information into Everbridge. By following this tree, it will help you figure out the best way to get your information into Everbridge.
File Upload Versus Individual Contact Sync
The first question to ask: Do you want to sync contacts using “File Upload”or “Individual Contact Sync”? What is the difference?
Like everything else, the two different methods have pros and cons. When looking at these two options, the File Upload is by far the simpler solution. It is recommended that whenever possible you use the File Upload. There might be rare cases where a true real-time contact sync is needed, but think long and hard before you choose this option.
But I want my contact data to be up-to-date at all times:
When someone says they want to do individual contact sync, here is what we usually say:
- If you have an international organization or a system that allows a contact to update their own data, then the data may change constantly.
- If you follow Everbridge best practices and use multiple modalities, the chances that BOTH a catastrophic event that impacts specific contacts AND none of their contact data is current are very low.
- You could even do a file upload twice a day, but statistically speaking, it is probably not necessary.
File Upload Versus Individual Contact Sync Comparison
The "PROs" are in green.Area SFTP - File Upload API - Individual Contact Sync Cost Developing a file upload is relatively quick and straightforward.
SFTP is included in your purchase.
This option can be VERY costly to develop and maintain. Our estimates are around 10 to 100 times more expensive than file upload. Data Extraction Getting data out of most System of Record (SOR) systems into a CSV format is relatively straightforward. It is most likely something your Admins have done before and know how to do. To get data out of the SOR system, either 1) your developers would need to figure out how to do it, or 2) It might be possible to have your SOR Admins do it in a text format, but at that point you might as well upload the file. Documentation Every aspect of the file upload is well-documented. References to everything you need to know for file uploads can be found in knowledge article EBS: Troubleshooting & Configuration Guide for Contact Uploads - Main Page API documentation is available but it is not nearly as complete as for File Upload. There will also be activities you need to do that are not documented like how to resolve all the references. Everbridge Support The Everbridge Technical Support team is well versed in how the File Upload works and can help you track down most problems you encounter. Support is not as familiar with API and is unable to help debug your code. Maintenance It is easy to add/remove data fields. It can require as little as changing one line that does the data extract. If you want to add a new field, you would need to find a developer resource, they would need to become familiar with the existing implementation, develop changes, and test to make sure they did not break anything. Reliability You are only making one call outside your infrastructure. If that call fails, you can always do a manual upload until you resolve the problem. Requires numerous API calls; one for each operation (Get, Put, Post, Delete). Each API call has a chance to fail! Resources Just your SOR admin and some help from someone in IT who knows how to schedule a job. Requires a software engineer with the following skill sets to build:
- SOR extract knowledge
- CSV formatting
- RESTful API
- JSON
Time to Live To go live with this option, you just need to figure out how to extract the data. You could then upload it manually and start using Everbridge. Full automation is simple once you have your upload file. This can take a while! You usually cannot go live until all the development is complete, fully tested, and moved to production. Encryption Options For SFTP, Everbridge only supports the use of our key. If you cannot use our key with your SFTP process, then you cannot use SFTP. You can use your own encryption key. Failure Recovery Depends on the File Upload type. If Replace is used, it is easy. Just upload the file or wait until tomorrow. If UPDATE is used, you will need to reprocess the files that failed. Very hard. How do you keep track of all failures and what data failed to update? Usually a full re-sync capability will be required. Error Handling This is easy with a File Upload. You can go into the UI and see what the errors are. You also have the option to inspect the file in Excel. You need a developer to look at any issues here. Everything is done with JSON objects and IDs. You need to hope your developer has good error-handling skills. Data Accuracy Data can be as old as your last file upload. To get more real-time data, you can consider using “Last Known Location”. Data can be kept up-to-date in real time. Flexibility There are some activities you cannot do with a single file upload, such as maintain a “Manually Managed” group. Complete flexibility. With this solution, you can do anything anyway you want. There are also some fields you can update with API that you cannot update via the File Upload such as:
- Subscriptions
- Quiet Times
Individual Contact Sync
If you have chosen to go with individual contact sync, there is a good chance your situation is unique and Everbridge suggests you reach out to Professional Services for assistance with your special requirements.
File Upload
File Upload First Consideration
When you sync contacts with Everbridge using file upload, there are three actions you need to do:
- Create contacts
- Update contacts
- Delete contacts
Replace File vs Update/Delete
You can accomplish these in two different ways:
Replace. This method requires one file:
- A Replace file. Super easy, what you send in is what you will get. If the replace file works for you, then go for it!
Update/Delete. This second method requires two files:
- An Add/Update file. This creates any new contacts and updates existing contacts.
- A Delete file. This removes contacts.
Why do we recommend a Replace file?
Have you ever tried to figure out who was removed from a system? It is not easy. You need to compare a version of all contacts from the last upload file to the new upload file. Then you figure out everyone who is missing, build the delete file, and upload it. What happens if you miss someone, do they stay in Everbridge until you do an audit?
If you can create a Replace file, your life is much easier. You dump out your HR system data as a Replace file and upload it. Let Everbridge do all the work. If a contact is NOT in your replace file, then he or she is automatically removed.
What are the situations where you can and cannot use a Replace file?
The main reason you might not be able to use a Replace file is if you have multiple sources for contacts with the same record type. In this situation, we suggest you discuss your options with your implementation specialist.
For more information on replace and update, see knowledge articles:
- EBS: Contact Upload Replace Option in Everbridge Suite
- EBS: Contact Upload Update Option in Everbridge Suite
Getting File Upload Working
First, let us congratulate you on choosing the File Upload!
Replace File
Get ready for these two big steps:
- Extract your data into Everbridge format.
- Transfer the file to Everbridge.
Update and Delete Files
For this part:
- You will need to extract your add and change records into one file and all your deletes into another file. This can be a little tricky. You might want to check with your SOR Admin on how to do this.
- Transfer the files to Everbridge.
All Options
From your SOR, you will need to extract your contact data to conform with the Everbridge upload file format.
More information about the data format can be found by downloading the Contact Upload template at the account or organization level. The example below shows how to access the template at the organization level.
- Log in to the Everbridge Manager Portal and select your Organization
- Select Contacts + Assets > Contacts > Uploads
- Select Download Template
For detailed information on the file format for contact uploads see the following knowledge articles:
- EBS: Contact Upload User Guide
- EBS: How to Create and Upload a CSV File for Loading Contacts Into Everbridge Suite Including Contact Sample Records
There is also a lot more information available in the Everbridge online help sections that provides details of each column in the CSV file.
File Transfer - Testing
At this point you should have your file(s) ready for upload to Everbridge. Something to keep in mind is that there are three ways to upload a file. All three ways work exactly the same.
- UI (User Interface) – You can log into the UI and upload the file manually.
- SFTP – Everbridge has the ability to accept a file via Secure FTP.
- API – There are calls under /uploads that allow you to send a file via API.
Just to reiterate, all three of these methods work the same way.
Now that you have your file(s),you can easily test them using the UI. Use the UI to perform the transfer. This will allow you to find any errors with the upload file before you try to automate the process. This is like learning to walk before you run.
File Transfer - Automation
If you made it this far, you are only one step away from using the Everbridge platform. There is one more decision to be made.
The one last question is, should I use SFTP or API for the file upload?
Things to consider:
- SFTP is included in your purchase. The API might be an extra expense.
- For SFTP, Everbridge only supports the use of our key. If you cannot use our key with your SFTP process, then you cannot use SFTP.
When it comes to support, we have documentation on both SFTP and API. Documentation on SFTP may be found in the Everbridge Support Center and documentation on API may be found in the Developer Portal.
File Upload Common Questions
These common questions only apply to the file upload. Watch Formatting a File for Upload on YouTube for more information on these commonly asked questions. For the Individual Contact Sync you will need to work with Professional Services.
What is the required data for any contact?
- First Name
- Last Name
- External ID
- Record Type
Do I need all the headers in the file upload template?
No, you do not need all the headers. The only required headers are listed above. The order and number of headers does not matter. Everbridge will only update the fields for headers included in your upload file.
Note: As a best practice, only include the headers are you using. For example, if you do not include a column for Email 2, then the Email 2 field will not be updated.How do I tell if I have the file format correct?
If you have a test organization, just upload the file and look at the upload file results in the UI. It gives you details for all errors.
- Log in to the Everbridge Manager Portal and select your Organization
- Select Contacts + Assets > Contacts > Uploads
- To see more details click on the binoculars to the left the upload you want to view.
Contact Uploads Help
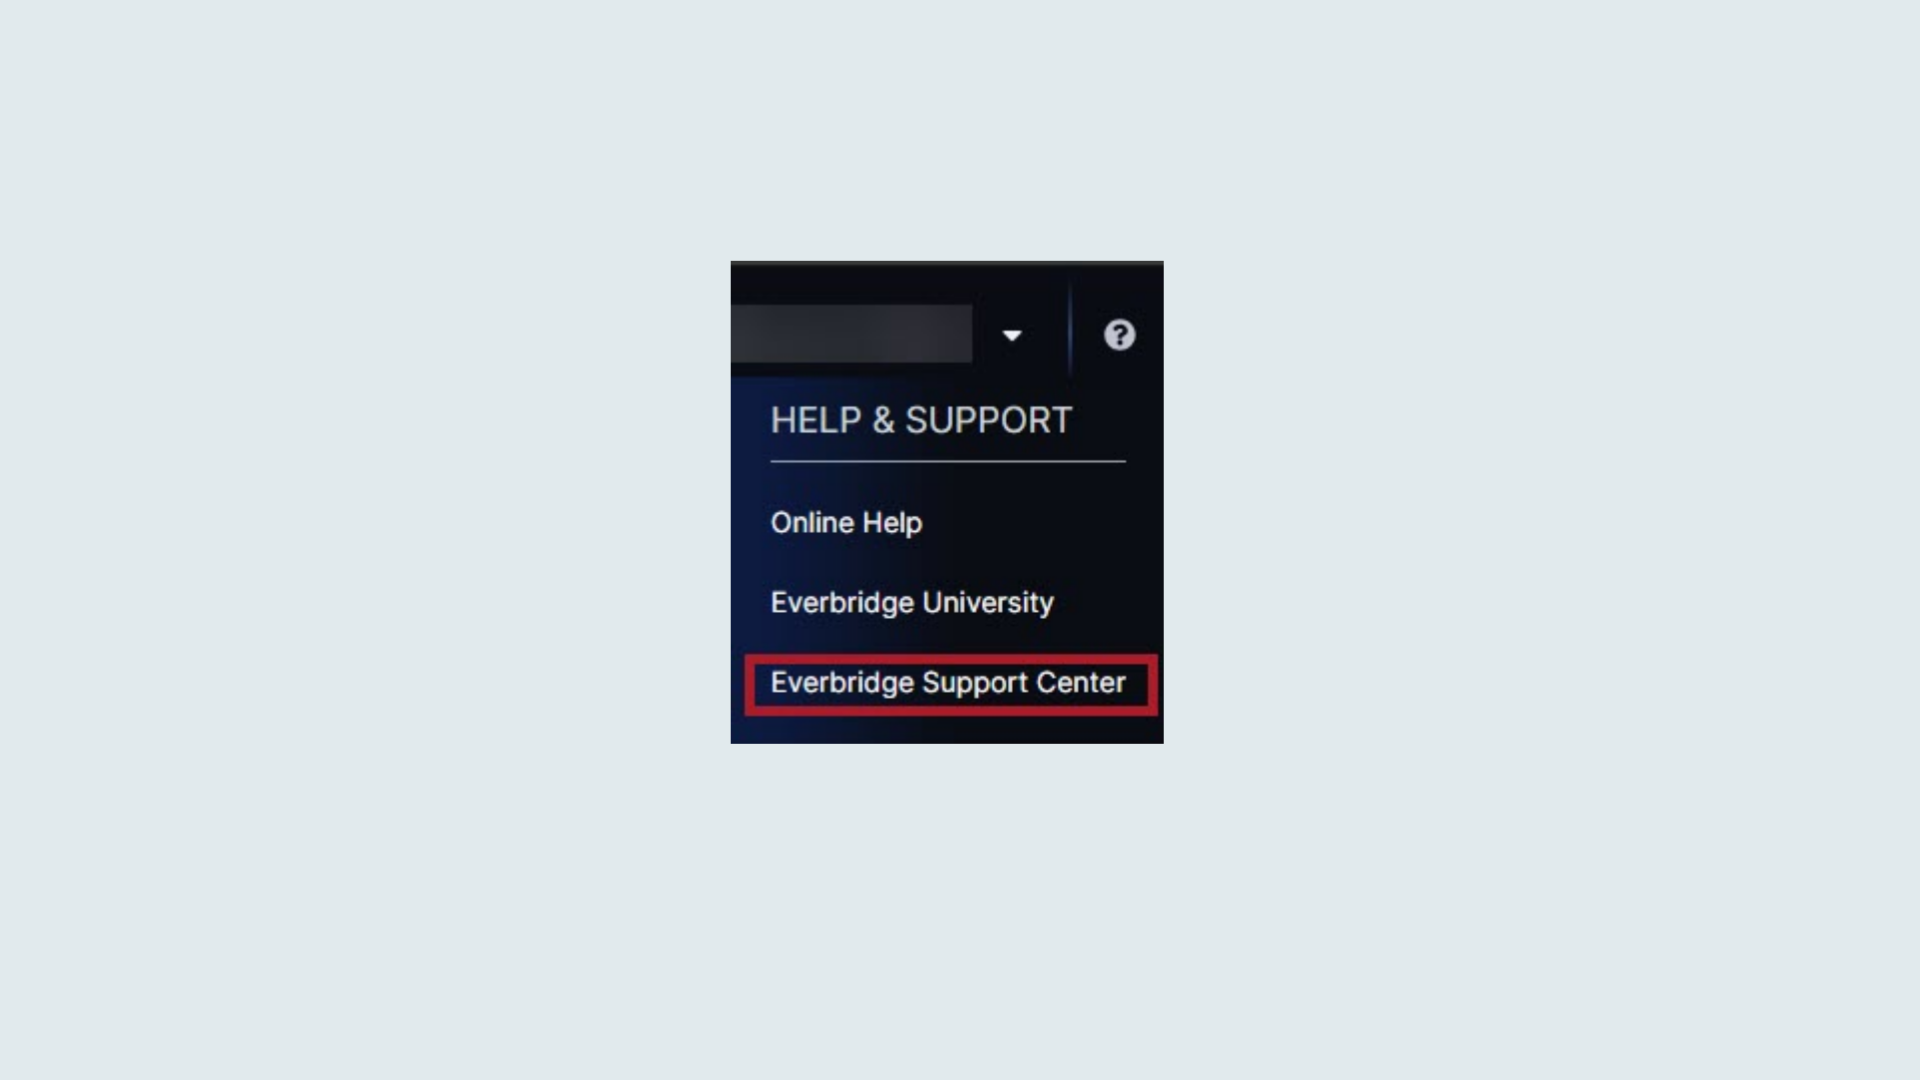
- From the Manager Portal click the ? in the upper right corner to display the HELP & SUPPORT drop-down menu.
- Select Online Help.
- Search for Contact Uploads in the search bar and select the appropriate option
Resources
- A valuable resource for everything contact and contact upload related is knowledge article EBS: Troubleshooting & Configuration Guide for Contact Uploads - Main Page which has pointers to videos, articles and training on contacts and contact uploads. This is a great starting point for learning, designing, and troubleshooting questions and issues related to contacts and contact uploads.
- Everbridge Support Center - Everbridge customers can access the Support Center by logging into the Manager Portal (manager.everbridge.net or manager .everbridge.eu) and choosing Help & Support from the far upper-right of the page, then the Everbridge Support Center link. You can peruse the entire knowledge base from the support center to find all available documentation on contact and contact upload related information.
- Online Help in the Manager Portal - Everbridge customers can access the Online Help by logging into the Manager Portal (manager.everbridge.net or manager.everbridge.eu) and choosing Help & Support from the far upper-right of the page, then the Online Help link.
- Everbridge University YouTube. Here you can find short tutorials on contacts and contact uploads as well as many other Everbridge-related topics.
-
Everbridge 360™ FAQ
This document provides answers to frequently asked questions about Everbridge 360™.
For an overview, see the knowledge article Everbridge 360™: What is Everbridge 360™?.Getting Started
How is the Everbridge 360™ experience enabled?
See knowledge article Everbridge 360™: Enabling the Everbridge 360™ Experience for Everbridge Organizations
How do you access Visual Command Center (VCC) in Everbridge 360™?
See knowledge article Everbridge 360™: Accessing Visual Command Center (VCC) in Everbridge 360™.
Will existing templates and configurations be preserved during the Everbridge 360™ upgrade?
Yes, the Everbridge 360™ upgrade is designed to build upon your existing Everbridge environment. All existing templates, groups, and configurations will remain active and available after the upgrade.
Left-Side Applications Navigation Menu
Where can I find information on the new left-side applications navigation menu?
See knowledge article Everbridge 360™: Left- Side Applications Navigation Menu
Who can try out the left side navigation menu in my Organization?
All users of the organization can activate the left side navigation menu by toggling on the Everbridge 360™ experience.
Will all the options in the existing top navigation menu be available in the new left side navigation menu?
Yes, all the existing options in the current top navigation menu will be available in the new left side navigation menu and users will only be able to access the menu options that their roles have permissions for.
Is the left side navigation menu available at the Account level?
Yes, the left side navigation menu can be activated at the Account level by enabling the Everbridge 360™ toggle in the top menu panel available to account administrators.
NOTE: All account admins will see the Everbridge 360™ toggle in the top menu panel at the Account level. The toggle at the Account level is not controlled by the activation of Everbridge 360™ at the Organization level.Event Types
What is the Event Type in the Launch Communication form?
Event Types define the type of events that impact your organization and are tied to the types of Communications you would like to launch to your contacts. Link every Communication to an Event Type for ease of tracking, reporting, and retrospective capabilities.
Risk-related Event Types (same as Category in Visual Command Center) will be available out of the box. Users can define their own Event Types under Settings > Organization > Everbridge 360 > Event Types when logged into an Everbridge Organization.
NOTE: Event Types is not the same as "Event Name" in Notifications
Things to consider when creating events based on future potential scope:
- Auto-suggests active Alerts linked to the selected Event Type.
- Associate Templates to Event Types.
- Configure Role permission to Event Types.
- Communications workflow driven by Event Types.
Everbridge 360™ App Mobile & Desktop
How do you install the Everbridge 360™ mobile app?
For organizations using the Everbridge Mobile App, there may also be interest in the new Everbridge 360™ app.
This app enhances the user experience with a refreshed and optimized interface. A desktop version is also available, offering new capabilities such as full-screen desktop takeover during life-threatening situations. These apps can be downloaded from the Apple App Store (iOS and macOS), Google Play Store (Android), and Microsoft Store (Windows). Later they will also be available via Everbridge.com.
These are the direct links: (NOTE: be careful not to change them in any way - if clicked, then copy the new link, you may inadvertently get the localized version which won’t work in all countries):Apple App Store: https://apps.apple.com/us/app/everbridge/id1632864063
Google Play Store: https://play.google.com/store/apps/details?id=com.everbridge.enterprise
Microsoft Store: https://apps.microsoft.com/detail/9nxmcpq30m43?hl=en-us&gl=US
How do you set the org code for the Everbridge 360™ mobile app?
An Organization Administrator can enable the availability of the mobile and desktop app for all users.
Org Admins can enable the Everbridge 360™ App through Settings > Everbridge Mobile App > Organization Code.
(Optional) Communications User Flow
How do I try the new Communications user flow in Everbridge 360™?
- Log in to the Everbridge Manager Portal (manager.everbridge.net or manager.everbridge.eu) and select your organization, OR Visual Command Center (https:// vcc.everbridge.net/ or https://vcc.everbridge.eu/) using:
- Username/Password
- SSO credentials
- Navigate to Settings > Organization > Everbridge 360 > Default Settings
- From Everbridge Manager Portal (Organization): Communications > Launch Communication
- From Visual Command Center: Situational Awareness > Visual Command Center > Click the Launch Communication button from an alert.
If Everbridge 360™ is turned off, will the Communications module remain visible in the UI?
No, if Everbridge 360™ is toggled off at the Organization level, the Communications module will not appear. The visibility in the UI is determined by the user's action of enabling the 360 toggle. When the 360 toggle is enabled by a user, the Communications module will appear in the left menu but not in the top menu.
Additional References
-
Overview
The Everbridge Customer Support team is available 365/24/7 by phone, email and via our Support Center. The customer support team will work with you on any questions you might have. Please note that there are some limitations as to what the team can and cannot do and this document highlights the services that fall outside the normal support coverage.
What Channel Is Right for You?
Everbridge University
Log in to Everbridge University for training on the Everbridge Suite products.
How-to videos
Product Training
Certifications
Knowledge Base
Search our knowledge articles for resolutions to common issues, product documentation, and how-tos.
Account Management
Reach out to your Account Manager for the following:
Add premium features
Training requests
Pricing/Billing
Total contacts allowed in your Account/Organization
Documentation about Service Level Agreement
Contract details
Professional Services
Account credit inquiries
Understanding new features and functionalities
Customer Support
Reach out to our technical support team for the following:
Walk-through performing a task in Everbridge Suite (ie. uploading contacts, sending a notification, creating a scenario)
Questions on achieving a specific goal (ie, if setting up groups could be a solution for your use case)
Troubleshooting an issue
Help with system-level integration issues
Assistance with accessing help articles
IMPORTANT: Support will not make account permissions changes/additions but can walk you through the steps.
Available Resources
Type
What Can Support Do?
What Will Support NOT Do?
Other Resources
Walk you through how to do a particular task
Modifications to your account
Recommendations based on best practices
Provide a full analysis and recommendations based on your organizations use-case
Contact your Account Manager
Walk you through the steps to make the modifications
Modifications to your account
Troubleshoot errors
Recommendations for successful uploads
Modifications to your account
Correcting errors made by an external feed
EBS: Troubleshooting Contact Upload Error Messages in Everbridge Suite
Professional Services (additional fees may apply)
Troubleshoot errors
Create or modify anything in Advanced Reporting
Walk you through the process
Submit the idea on your behalf
Prepare an upload ready file with the data
NOTE: Data refresh requests cannot be processed until you supply a list of zip code and a shape file of your boundary
Uploading data in your account
Walk you through how to restore deleted contacts
Provide guidance on how to retrieve lost data from previous upload files or notifications
Restore your data
NOTE: Everbridge is unable to restore contact data that was mistakenly modified. Everbridge is also unable to restore contacts deleted over 30 days prior
Professional Services (additional fees may apply)
Retrieve logs from the Everbridge platform
Troubleshoot connectivity issues from the Everbridge platform to the conference bridge
NOTE: The issue must be reported within 3 days
Troubleshoot issues where the conference bridge is used outside the Everbridge platform
Retrieve logs from the Everbridge platform and downstream provider
Troubleshoot configuration issues
Escalate to downstream provider (the more examples we have the better chance we have of finding a solution)
NOTE: The issue must be reported within 1 day
Contact your SMS provider
A possible workaround for non delivery of SMS messages is to use Push notification via the Everbridge Mobile app
Retrieve logs from the Everbridge platform
Troubleshoot configuration issues
Troubleshoot problems on the receiving server, you must contact your local IT personnel
Retrieve logs from the Everbridge platform
Troubleshoot configuration issues
Escalate issue to downstream provider (the more examples we have the better chance we have of finding a solution)
NOTE: Issue must be reported within 24 hours
Contact your phone provider
Give API access to a user (Request must be made by an administrator)
Basic help with JSON
Retrieve logs from the Everbridge platform
Troubleshoot scripts
Troubleshoot JSON
Professional Service (Additional fees might apply)
Help with configuration from Everbridge Suite
Troubleshoot issues due to Everbridge Suite configuration
Completing your SSO Configuration
Assistance with IDP side of your configuration
EBS: Troubleshooting & Configuration Guide for Single Sign-On (SSO) - Main Page
Professional Service (Additional fees might apply)
-
Provide guidance on how to use a feature
Enable premium features in your account
Walk through how to send a notification
Send notifications on your behalf using Everbridge's Live Operator service
Send a notification without proper authentication
Send a notification on behalf of an SSO user with no break glass credentials
Send a notification on behalf of a user who doesn't have a role that permits sending notifications
Additional Information
General How To Question
If you do not know how to perform an action in your account, visit our Support Center for a comprehensive list of knowledge articles and training classes. If you are unable to find the instructions on what you would like to do, our customer support team will gladly assist you. Please note that for security reasons, the customer support team will not make the modifications on your behalf. You will be expected to make the changes.
General Consultative Questions
If you have questions that are specific to your use case(s), it is best to contact your Account Manager to arrange a call with our Sales Engineering team or with our Professional Services team. Although our Support Team is available to assist, they may not have the in-depth use case knowledge needed to adequately answer and address your questions. Our Sales Engineering team and Professional Services team have resources dedicated to specific verticals and will be more familiar with your use case(s). Some use case examples are: how to best utilize SMART Weather; how to engineer an API solution; and best practices for meeting your business objectives. Please note that some extra fees might apply.
Modifications in Your Account
You are responsible for any modifications required in your account. Please note that Everbridge Technical Support team is not permitted to make changes in your account. Your organization's Account Administrator is responsible for managing Everbridge account settings. This is usually someone in your IT or HR departments who can help you add or remove alert subscriptions and update your contact information. If you are unsure on how to make the change, the team will walk you through the process, but they will not be able to make the modifications for you.
Upload Issues
If you are having problems uploading contact data, the customer support team can help you identify the source of the problem. They will make recommendations based on your data. Please note that for the team to help, you will need to provide them with a copy of your data. If, for security reasons, you cannot send the data by email, the customer support team can provide you with a link to a Box account to transfer the data. Once the source of the error(s) has been identified, you are expected to modify your upload file. The customer support team cannot make the modifications on your behalf. If your data comes from a feed from your Human Resources department or system, you will need to contact them to make the appropriate changes.
Data Refresh
Whenever requesting a data refresh from Everbridge, our Support team will need the following information:
A list of zip codes (for US data refreshes only)
A shapefile of your boundary
Your data refresh request cannot be processed without this information. Once this information is received, our customer support team will prepare an upload ready file with the data. Since our customer support team is not at liberty to upload data in your account, you will be responsible for uploading the data yourself. Be sure to take a backup of your data first. If you are uncomfortable performing the upload yourself, the support team will walk you through this process.
Alternatively, the instructions for uploading the data are available in knowledge article EBS: Contact Upload User Guide.
Data Restore
If you have mistakenly deleted your contacts, they can be restored from the Deleted Contacts tab. For instructions on how to restore one or multiple contacts, see knowledge article EBS: Restoring Deleted Contacts in Everbridge Suite
If you have mistakenly modified your contacts, there is no easy way to restore them to what they were like before the upload. You might be able to restore the contacts using a previous upload file. If you do not have it, our support team can recover it up to 30 days after an upload. Our customer support team might be able to guide you on how to best restore your contacts data. Please note that Everbridge is unable to restore data otherwise.
Conference Bridges
The customer support team will be able to help troubleshoot conference bridge issues if the connection to the conference bridge is made from a notification sent via our platform. If the conference bridges are used outside of our platform, we will not be able to troubleshoot the problem. If you have problems using our conference bridges, it is important that you report the issue to our customer support team promptly as logs are available for a maximum of 3 days.
SMS
If you have a problem with SMS messages, please report the issue as quickly as possible to our customer support team as logs are available for a short period of time (24h).
Troubleshooting information regarding notifications not received via SMS can be found in knowledge article EBS: Troubleshooting SMS Message Issues in Everbridge Suite.
When calling in the customer support team for help with undelivered SMS messages, they will go through the troubleshooting steps to help identify where the problem may be. If the problem can be rectified by modifying the record or how the notification was sent, the customer support team will let you know.
Please note that if the problem is due to the device of the recipient or their carrier, the Everbridge customer support team will not be able to assist further. Everbridge is unable to talk to carriers directly as we are not their customer. If the issue can be reproduced consistently and is happening to multiple recipients (or multiple times with the same recipient) using the same carrier, we can ask our downstream provider to contact the carrier directly. Please note that our vendor is under no obligation to do so and that even if they do, the carriers are under no obligation to resolve the issue. If that's the case, your Everbridge Customer Support Engineer will notify you. At which point, your only alternative will be to contact the carrier directly.
Emails
Upon request, the Everbridge Customer Support team can recover logs that show that messages were delivered and whether they were delivered on time. If an email is not delivered or is being delivered with a delay or is sent to the spam folder of the recipient, Everbridge cannot help resolve the issue. If our logs show that the email was successfully accepted by the receiving server, you will need to contact the IT personnel in charge of the email server for resolution. Everbridge can supply the logs that your IT team feels would be useful in their investigation, if they are available.
Phone Calls
If you have a problem with phone calls, please report the issue as quickly as possible to our customer support team as logs are available for a short period of time (24h).
Voicemail vs Human Detection
We do our best to ensure the highest reliability of the voicemail vs human detection but there are many factors outside of our control. There is no standard for voice mail systems and no standard for voice mail "beeps" or tones; therefore, there is no way to develop a solution that will accurately detect voice mail 100% of the time. Please see knowledge article EBS: Voice Notification Recipient Best Practices in Everbridge Suite to improve your chances of the correct detection by our system. If your recipients experience voicemail vs human detection issues, you can contact our customer support team to help you troubleshoot the issue. They will to their best to help correct the problem for you but there is no guarantee they will find a solution for you as voicemail vs human detection is not 100% accurate. If a contact is constantly having problems with the correct detection, they can choose to bypass the voicemail detection by following the steps outlined in knowledge article EBS: How to Bypass Voicemail Detection in Everbridge Suite.
API Problems
To use the API, you will first need to create and register a user. Please note that users should have permission to perform the steps you intend to take using the API. An API user is restricted just like a logged in user in what they can do by their role. Once the user has been created and registered, send a request to our customer support team to give API access to the user. Please note the request must come from an Account Admin. The team will need to know the account the user is in as well as the username. Information on how to use the API can be found in the Everbridge Developer's Hub.
Due to the nature of the API, the Everbridge Customer Support team is not able to troubleshoot scripts or coding of any kind. If you would like help building your application, please contact your account manager and see if it is a project our Professional Services could help you with.
If you are having problems with calling a method, be sure to mention to the customer support team which method you are using and send them a copy of the JSON. It is imperative that the info you send be a JSON and not code from your own script or application otherwise the customer support team won't be able to help you. The customer support team will test the call in the Swagger interface, located here https://api.everbridge.net/. If the call works, you will be responsible for modifying your script. If the call doesn't work, we will troubleshoot to identify the source of the problem.
Single Sign-On (SSO)
The Everbridge Customer Support team cannot configure SSO for customers. Instructions on how to configure SSO can be found in several different knowledge articles found in EBS: Single Sign-On (SSO) Resources - Main Page depending on your specific scenario. If you require help configuring SSO, please contact your account manager and see if the Professional Services team can help you.
If you believe SSO has been configured correctly, please refer to the troubleshooting section of knowledge article EBS: Single Sign-On (SSO) Resources - Main Page or provide a copy of your IDP server's metadata file, the SSO user ID of the person having problems, as well as the SAML response for that user. Please note that the technical support team can only help with the configuration on the Everbridge Suite side. If the user is misconfigured on the IDP server or the IDP server is misconfigured, the customer technical support team will not be to assist further. You will need to contact your IT personnel.
Feature Provisioning
Our customer support team is not permitted to provision new features. This includes the creation of new organizations in your account. Please contact your account manager if you would like a new feature turned on for your account. If you would like help on using a new feature, our customer support team can walk you through how to use the new feature. If you need assistance understanding new Everbridge features, contact your Account Manager for personalized guidance or to request a training session to learn about recent functionalities.
If a specific feature is not currently available in your account, reach out to your Account Manager or Everbridge Technical Support. They can help determine if the feature can be enabled for your organization. If you contact Technical Support be prepared to provide your Organization ID and specific details about the feature you need.
Sending a Notification
If you are unable to send a notification, you can call our Emergency Live Operator line. Our customer support team can send the notification on your behalf. Please note that you must have a valid and registered user. The password must not be expired. You must authenticate the call for our support team to launch the notification on your behalf and your role must allow you to send notifications. Our support team cannot send a notification on your behalf if you use Single Sign-On and do not have break glass credentials. Please see knowledge article EBS: How to Initiate a Notification, Incident or Scenario via Emergency Live Operator (ELO) in Everbridge Suite for more information.
Closing a Case
While we will do our best to resolve all problems reported to us to your satisfaction, we sometimes exhaust all avenues without finding a resolution. Cases might be closed without a resolution in the following situations:
When an issue reported is due to a defect, the customer support team will inform you of the defect ID and the case will be closed. When the issue is resolved, it will be included in the list of resolved defects in the release notes, which are available on our support center.
When our investigation concludes that a change must be made in your account by an administrator, the customer support team will inform you of the changes you need to make. The team will keep the case opened for up to a week to allow you the time required to make the changes. If you have follow up questions or if you still see the issue after making the changes, you can contact our support team and the case can be reopened at any time. The same process applies if the change is to be made by your IT personnel.
When our investigation concludes that the problem is with another software that you utilize like an SFTP client. The customer support team will direct you to contact your vendor's customer support team.
-
Everbridge is committed to helping our clients achieve and maintain performance excellence. As part of our commitment, it is our goal to improve the Everbridge services by managing and resolving your technical inquiries. The purpose of this document is to communicate the support options and processes, and to effectively manage service expectations.
The following technical support services are available to clients as part of the Everbridge solution:
- The self-service Support Center, email support, and phone support are available 24x7x365.
- A top-priority phone queue to the Emergency Live Operator service is provided to help you send emergency notifications if you cannot access the Everbridge interface directly, and five emergency live operator messages are available per year without any additional cost. The Emergency Live Operator service is available 24x7x365.
NOTE: this services guide applies to users of the Everbridge Suite™ solutions. Only English language technical support is provided at this time. The Emergency Live Operator service is unavailable for Crisis Commander clients who do not have access to the Everbridge Suite solution.
Everbridge Technical Support Contact Information
From within the Everbridge Suite solution, choose Help & Support, then Everbridge Support Center to access the Support Center, where you can access personalized contact information, real-time system status, support cases, and more. Crisis Commander clients can contact support using the information below. See also knowledge base article EBS: Contact Us.
Contact Method Contact Address/Number Everbridge Customer Support Email support@everbridge.com Global Direct Phone Customer Support Support +1 818-230-9798 Australia Toll-Free Customer Support (1300) 561795 U.S. & Canada Toll-Free Customer Support 866-436-4911 United Kingdom Toll-Free Customer Support 0800-098-8031 Germany Toll-Free Customer Support 0800-184-4301 India Toll-Free Customer Support 000-800-0501-480 France Toll-Free Customer Support 0-805-08-07-12 Spain Toll-Free Customer Support 900-86-85-61 Singapore Toll-Free Customer Support 3158-6002 Norway Customer Support (Mo-Fr,8:00-16:00 CET) 2350 1600 Everbridge Emergency Live Operator Contact Information Australia Toll-Free Emergency Live Operator (1300) 816168 Global Direct Emergency Live Operator +1 818-230-9797 U.S. & Canada Toll-Free Emergency Live Operator 877-220-4911 United Kingdom Toll-Free Emergency Live Operator 0800-098-8273 Germany Toll-Free Emergency Live Operator 0800-181-9027 France Toll-Free Emergency Live Operator 0-805-08-06-13 Singapore Emergency Live Operator 3165 5672 Spain Toll-Free Emergency Live Operator 900-83-88-75 Support Center
The Everbridge Support Center contains everything you need to know about our products and services, system status, answers to your questions, and contact information in case you need to submit a support ticket or contact us directly. To access the Support Center from the Everbridge Suite, choose Help & Support, then Everbridge Support Center.
Training Everbridge University offers a growing library of over 40 hours of training across more than 80 courses. Administrators and users can watch and listen to animated lessons in order to become an expert on the entire platform, or just get a quick refresher on a key subject. The online courses contain lessons that are focused on a task and are 10 minutes or less in length.
- New team members can get their training without waiting for a class or webinar to be scheduled.
- Rather than trying to find a topic in a webinar that can run an hour or more, the modular training provides specific key training areas for quick review.
- Viewers can easily fast forward or rewind to pin point what they need to know.
Knowledge Our knowledge base is full of articles created by the Technical Support team from real support cases, as well as reference material representing the shared knowledge of the other Everbridge teams, such as official product user manuals and implementation guides.
- Access all official product guides in a centralized location.
- Find answers to questions asked by other users pertaining to best practices, steps to perform a specific task, or workarounds to any known issues.
System Status Real-time information on Everbridge system performance and availability.
- Stay informed about upcoming, on-going, and completed system maintenance.
- Get the critical steps to minimize impact during service degradation events, and know when events are resolved.
- See the Service Advisories section below for additional information.
Support Cases All of the Everbridge phone and email contact information you could want in one place, including the Everbridge Technical Support and Emergency Live Operator contact information provided in the Contact Information tables above.
- Your organization's users can submit and review their own support cases right from the Support Center.
- Designated administrators in your organization can oversee all support cases for your account.
Support Case Management
Our team is available 24x7x365 and aims to answer all support phone calls immediately, and to triage support cases submitted via email or the Support Center within four hours.
When submitting a support case, you will receive an email notification when the case has been created. The notification will include the case number, the name of the Technical Support team member or tier assigned to the case, a summary of the inquiry, and the priority level that has been assigned.
Assigning Support Case Priority Initial Response Severity 4: Low General product questions, configuration assistance, or enhancement requests. Phone: Immediate
Email/Support Center Submission: 4 hours*
Severity 3: Medium Non-critical technical issues for some or all of your users where a workaround is available and notifications can still be sent. Phone: Immediate
Email/Support Center Submission: 4 hours*
Severity 2: High Critical technical issues for all of your users, issues without a workaround, or issues causing delays in your notifications. Phone: Immediate
Email/Support Center Submission: 4 hours*
Severity 1: Urgent For system unavailability across your organization where notifications cannot be sent and no workarounds are available. Phone: Immediate
Email/Support Center Submission: 4 hours*
*Cases must be triaged in order to determine priority. If your case is urgent, call Technical Support at a number listed above.
During the case triage process, the Technical Support team will work with you to obtain as much troubleshooting information as possible, open and assign a priority level to your case, then proceed with additional troubleshooting activities as necessary.
Security Considerations:
- If troubleshooting activities require access to your data that is hosted on Everbridge systems, Everbridge will request permission to view your data. Best practices are to provide this permission for each case, however, with written permission from Account Administrators, exceptions can be accommodated. Contact your Account Manager for details.
- Everbridge Technical Support will assist users/contacts with system access requests by guiding them through the use of "Forgot Username"/"Forgot Password" links.
- If the "Forgot Username"/"Forgot Password" links fail to resolve the access request for the user/contact, they will be referred to Organization Administrators.
- Everbridge Technical Support will be available to assist Organization Administrators with access requests for their users/contacts that are not resolved with "Forgot Username"/"Forgot Password" links.
- NOTE: For most Everbridge products, you own the data that is stored within our system. Everbridge is bound by security rules for compliance certifications and is unable to access anyone's system without their express permission. Reaching out to your Administrator is required in all cases where you are unable to reset the password yourself.
- Everbridge Technical Support will guide Everbridge Account Administrators through the process of creating user accounts but will not create the accounts for them. In the event there is no Everbridge Account Administrator, Technical Support will work with you and your Everbridge Account Manager (AM) to facilitate the creation of an Everbridge Account Administrator.
- Everbridge Technical Support uses Multi-Factor Authentication (MFA) when accessing customer data.
For complex inquiries, we may need to escalate your ticket to the next tier as defined below.Technical Support Tiers Tier 1 Rapid response to inbound support requests and initial investigation for more complex issues. Tier 2 If needed, the Tier 1 team may submit your case to Tier 2 for further investigation. The Tier 2 team generally performs additional investigation offline and follows up with you via phone or email. Tier 3 If needed, both the Tier 1 and Tier 2 support techs may escalate to "Tier 3" by partnering with other Everbridge teams such as Quality Assurance or our Cloud Operations Engineering team. Support will set your expectations as to when you will receive the next update on your case. If an expected update time frame is not known, you will still receive updates on your case on a regular basis. You may also request that your case be escalated at any time, if (for example) you believe an unreasonable amount of time has passed since opening your case with no resolution. To escalate your case, simply call the Technical Support team and ask to speak with the Support Manager.
Service Advisories
Everbridge communicates maintenance activities, service degradation events, and system status alerts via service advisories posted on the Everbridge Support Center. Service advisories are available for thirty days beyond the conclusion of the maintenance or event. If you would like to be notified of service advisories as they are posted, you can configure service advisory notifications by following the steps outlined in the following knowledge base article Support Center: How to Sign Up for or Unsubscribe From Service Advisories That Notify You of Updates, Changes And/or Issues Affecting Everbridge.
As of January 1st 2017, service advisory notifications for upcoming releases and other events will only be sent to users that have opted-in using the steps outlined at the link above.
Solution Maintenance
Everbridge is committed to maintaining the highest levels of performance and availability of our solution. There are occasions, however, when the service may be interrupted for planned or event‐driven maintenance. Defined below are the different categories of solution maintenance and the standard maintenance windows and advisory periods.
Planned Maintenance
Any maintenance activity with an anticipated impact to system performance, availability, or functionality is considered Major Maintenance and we provide a maintenance notification to our customers at least five business days prior to such maintenance as outlined in the Service Advisories section above. Our standard maintenance window for Major Maintenance is on Wednesdays between 6:00 PM and 11:59 PM Pacific Time.
Maintenance with little to no anticipated risk of user impact is considered Minor Maintenance. Such maintenance may be conducted anytime Monday through Thursday. A maintenance notification will not be provided for Minor Maintenance.
Unplanned Maintenance
In order to prevent or mitigate potential service degradation, we may occasionally need to conduct maintenance without being able to provide an advance notification. Such maintenance is considered Unplanned Maintenance and we would provide a maintenance notification to our customers at least two business days prior to such maintenance as outlined in the Service Advisories section above. This maintenance will also be limited to our standard maintenance window on Wednesdays between 6:00 PM and 11:59 PM Pacific Time.
Emergency Maintenance
If a service degradation does impact the Everbridge solution, our first priority is to restore service and resume normal operation. Under such circumstances, we may need to perform restorative maintenance. Such maintenance is considered Emergency Maintenance and may only be conducted on an as-needed basis, with explicit Senior Operations Management approval. Due to the nature of such maintenance, it may be conducted without any prior notice and any time of the day.
Incident Management & Root Cause Analysis
Everbridge understands that our customers rely upon our platform for assured critical communications, especially for health, safety, and critical business processes. We take incidents extremely seriously and work non-stop to resolve customer-impacting incidents. To provide a high level of service to our customers, Everbridge utilizes operational processes based upon the IT Infrastructure Library (ITIL) framework, a de facto industry standard for IT service management. Root Cause Analysis (RCA) is a component of the ITIL problem management process.
As outlined above, our first priority with any service degradation is to restore service and resume normal operation. Once service is restored the focus changes to analysis, determining the root cause, and preventing recurrence. Prevention may contain actions to improve detection through monitoring, building out additional or replacement infrastructure, or developing software enhancements. It may take several days of investigation and cross-team coordination to develop the appropriate course of action to best serve our customers. Engineering teams from many different disciplines become involved in the resolution and review of incidents that are impactful to the platform and to our customers.
You may request a copy of the RCA document for any Everbridge service degradations where the root cause was determined to be within the Everbridge solution. The Everbridge goal is to be able to provide a documented RCA after the resolution of a critical event within five days of a request. This document will contain the following:
- event start date
- event end date
- timeline of events
- root cause of the event
- corrective action(s) to restore service
An RCA is not provided if the root cause of the reported issue is determined to be outside of the Everbridge solution and therefore outside of the direct control of Everbridge. Examples of such issues would be regional telecom or Internet provider issues impacting the delivery of messages to recipients in a particular location or on a particular downstream telecom/wireless or Internet provider.
-
Topic
Resetting your Everbridge Manager Portal password.
Description
1. Introduction
This video walks you through the process of resetting your Everbridge Manager Portal password.

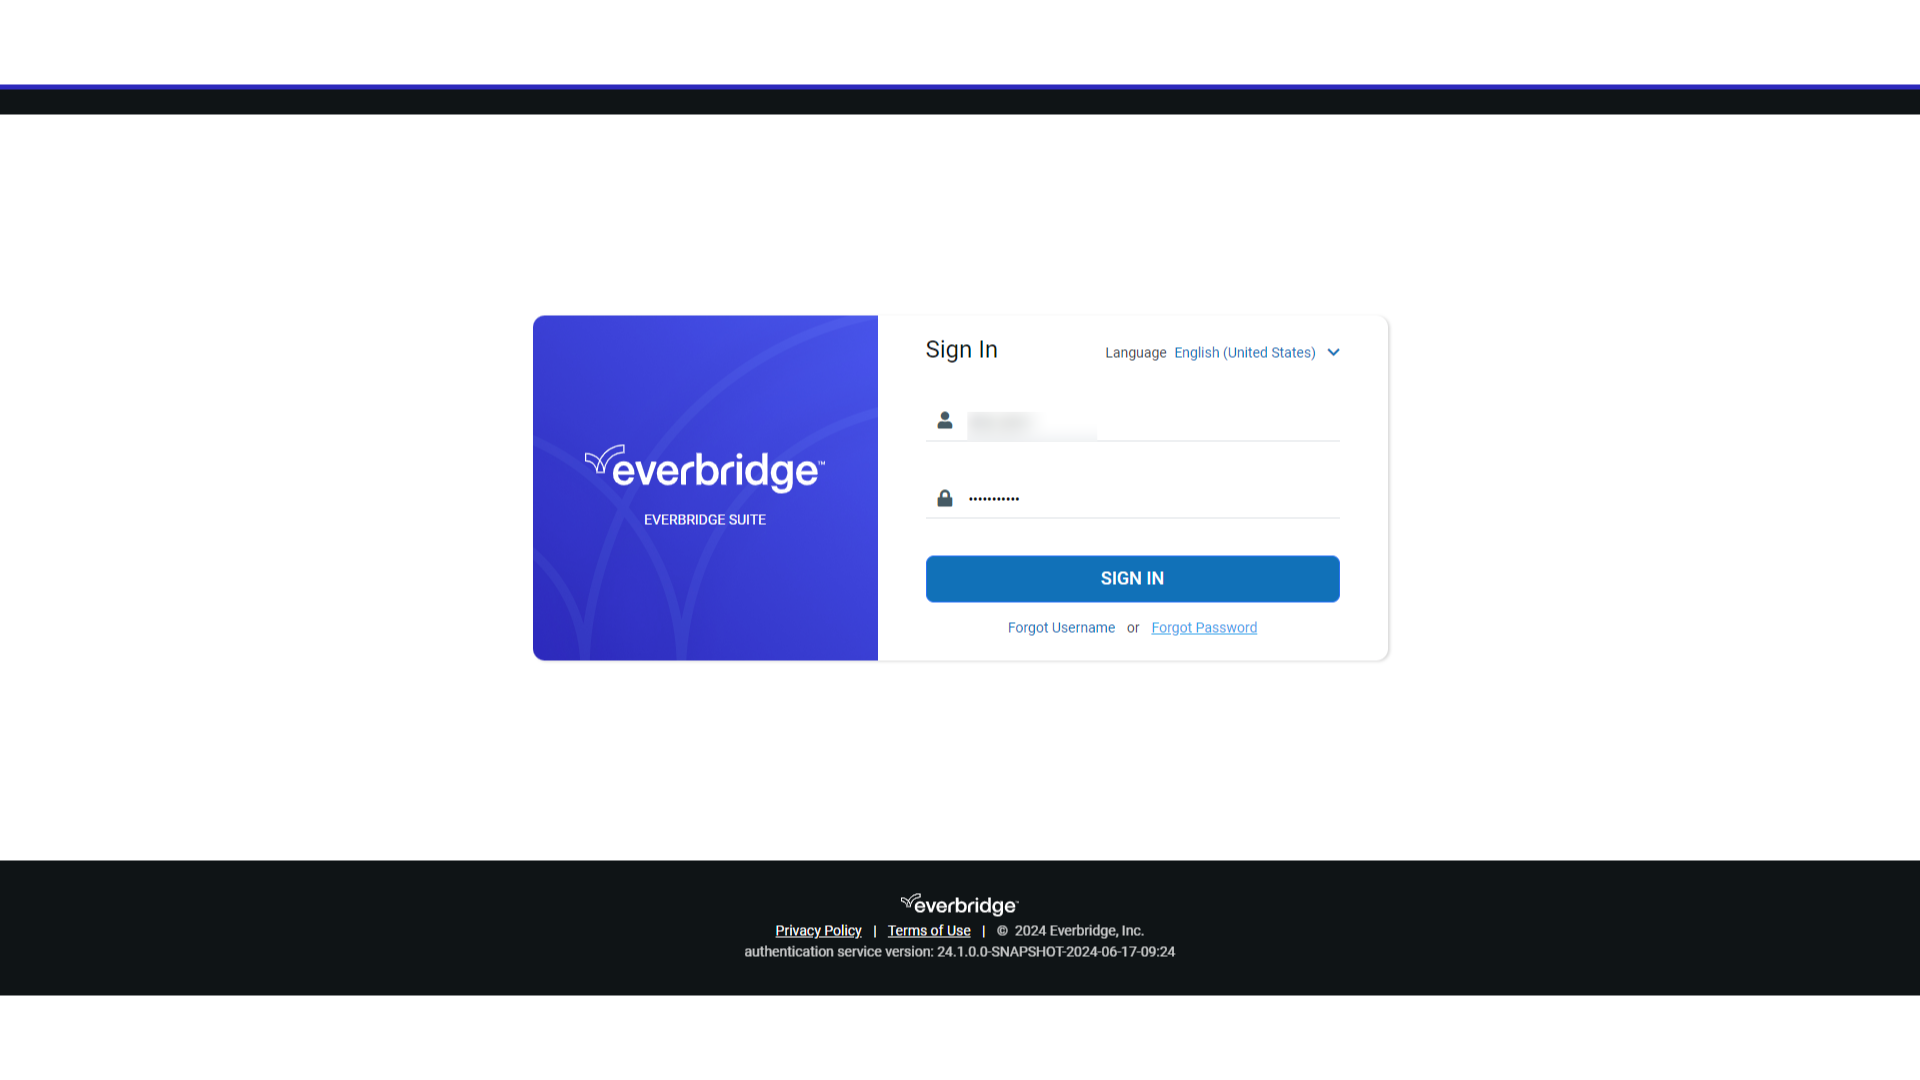
2. Manager Portal Login
Navigate to manager.everbridge.net or manager.everbridge.eu.
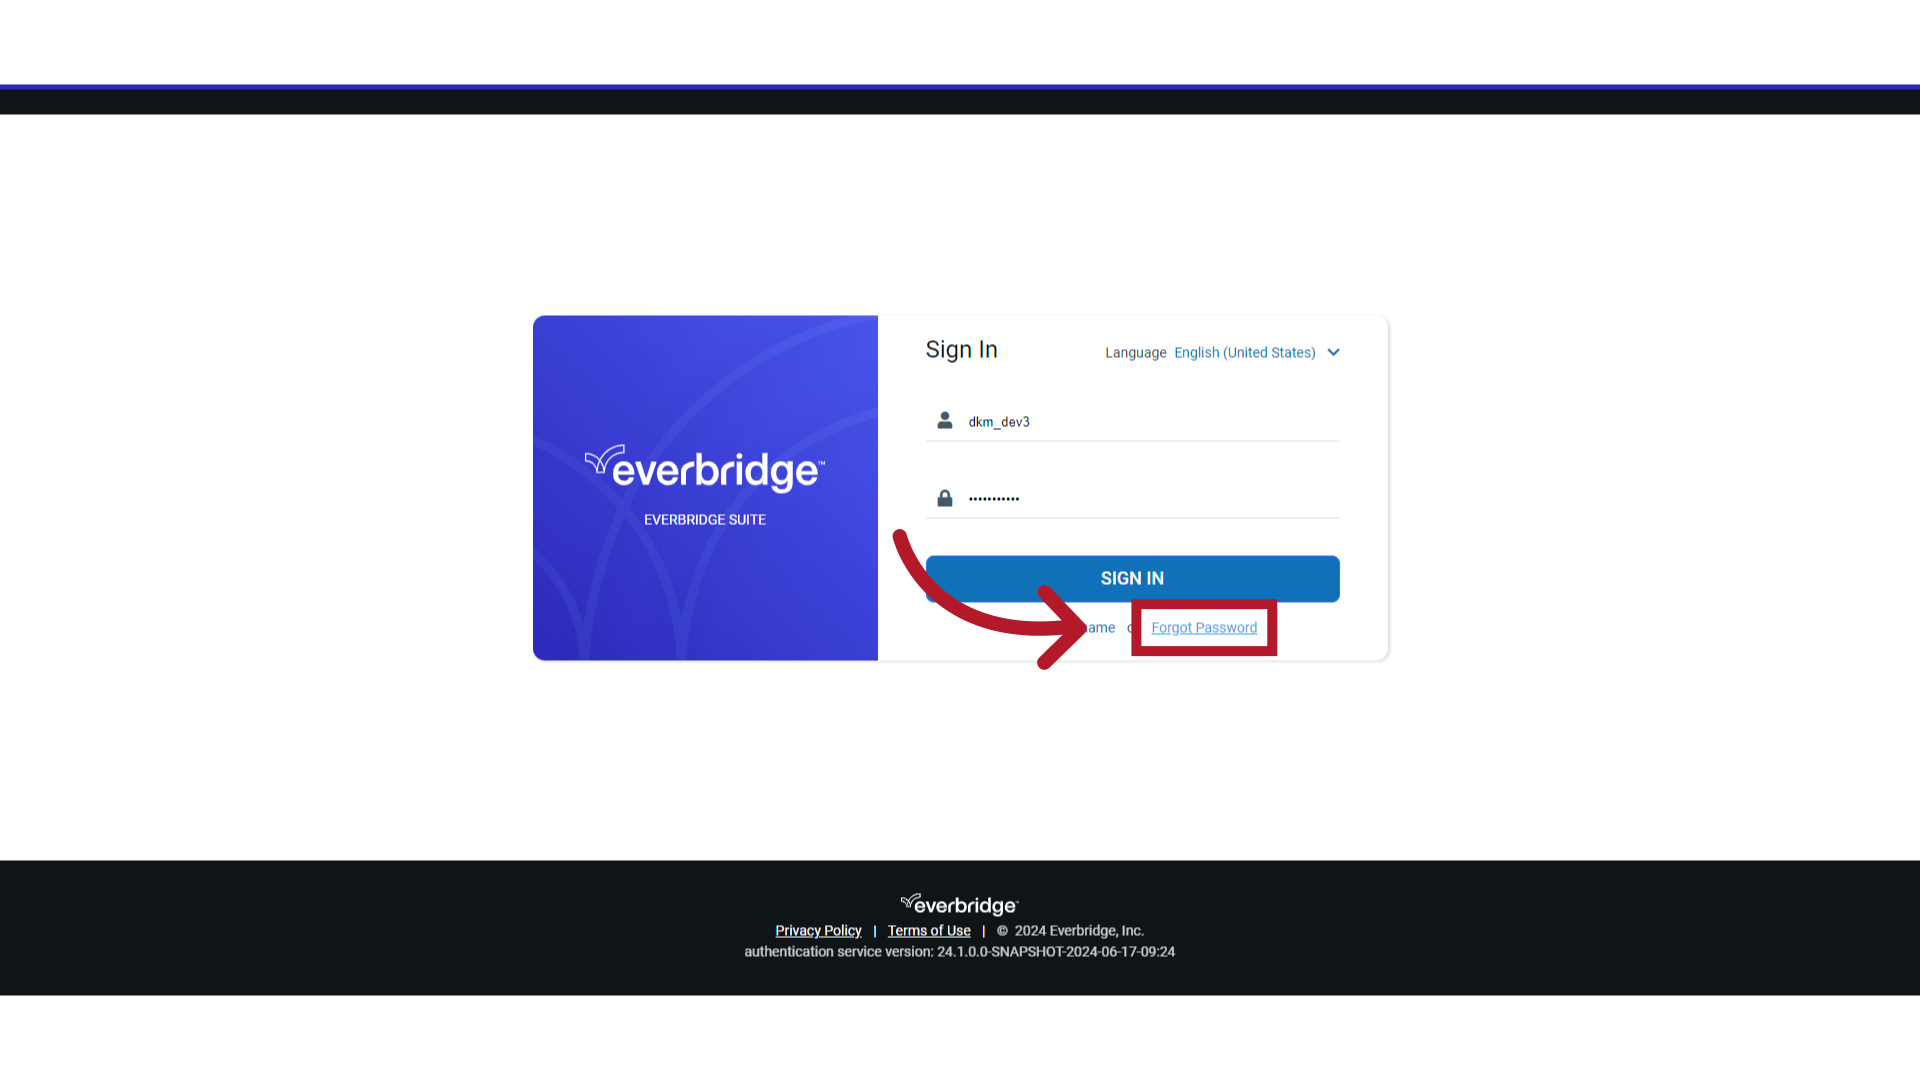
3. Forgot Password
Select "Forgot Password."
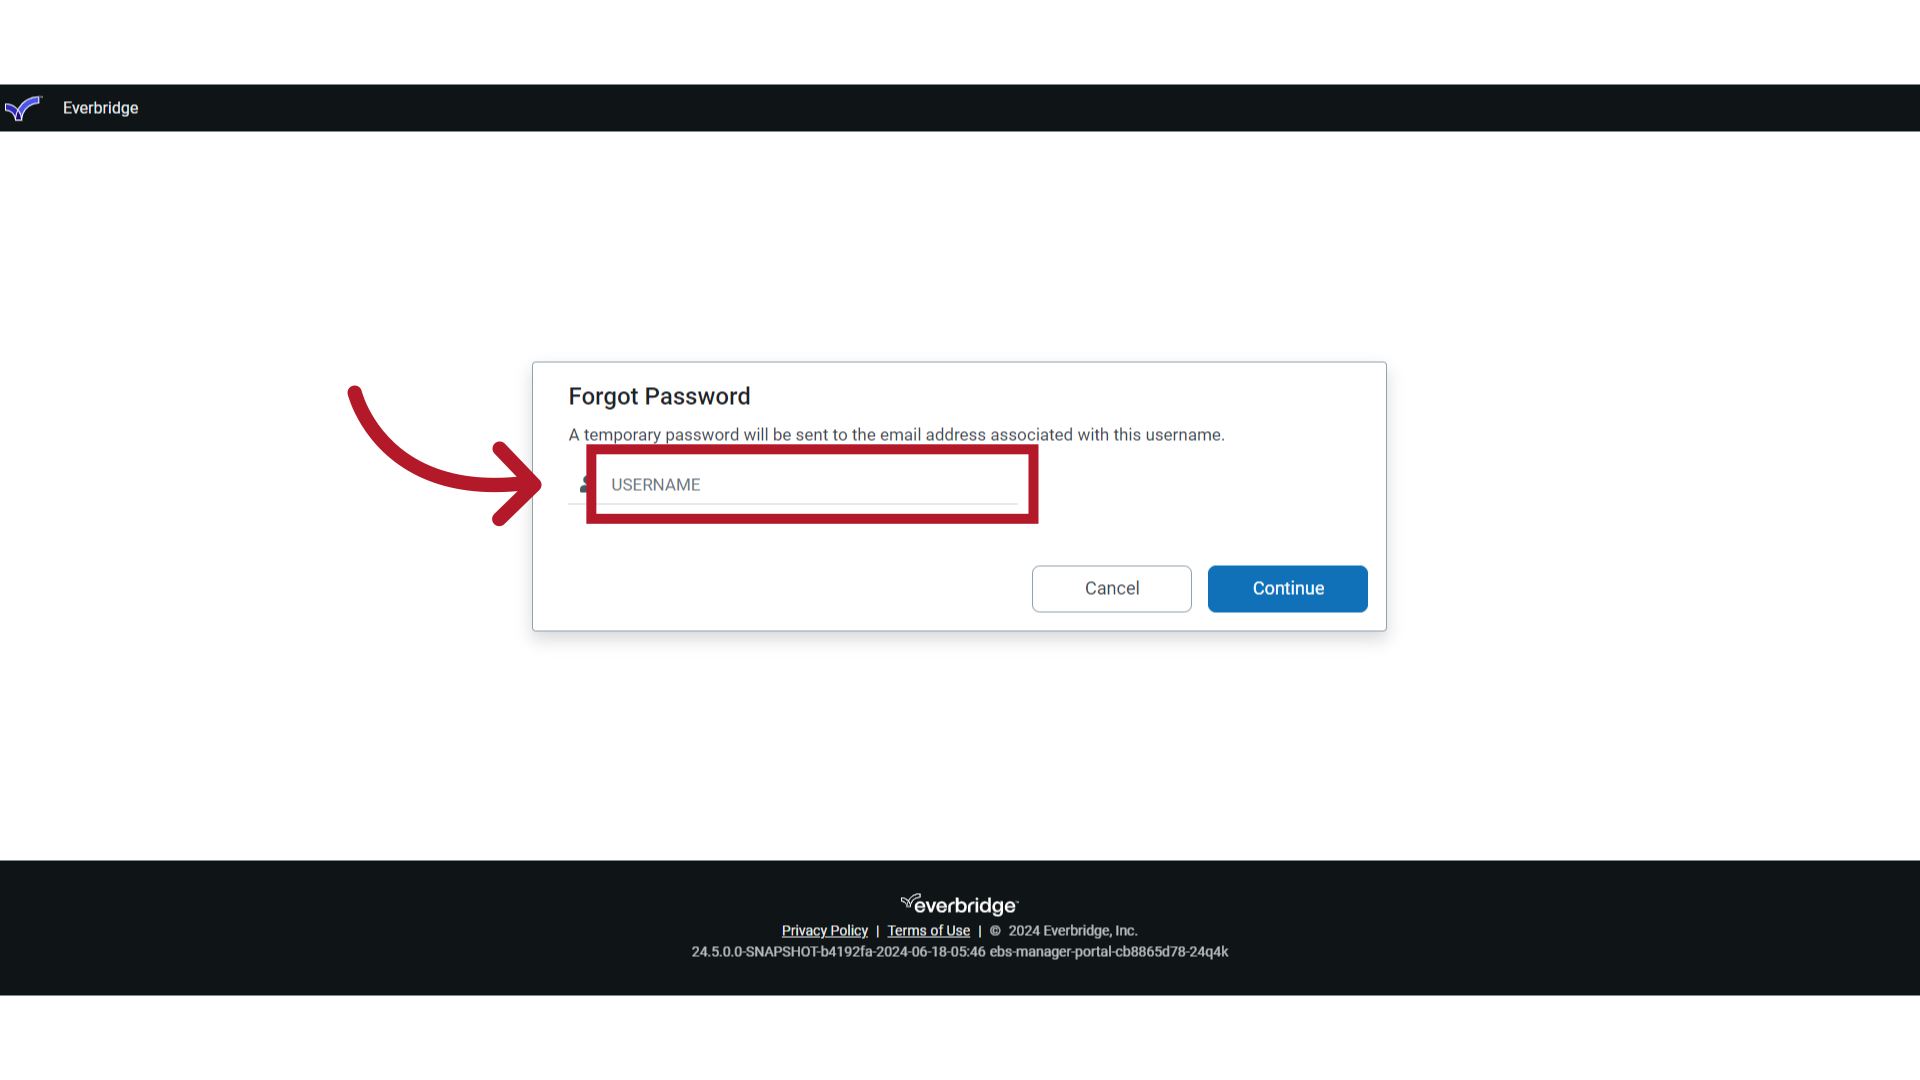
4. USERNAME
You are prompted for a USERNAME.
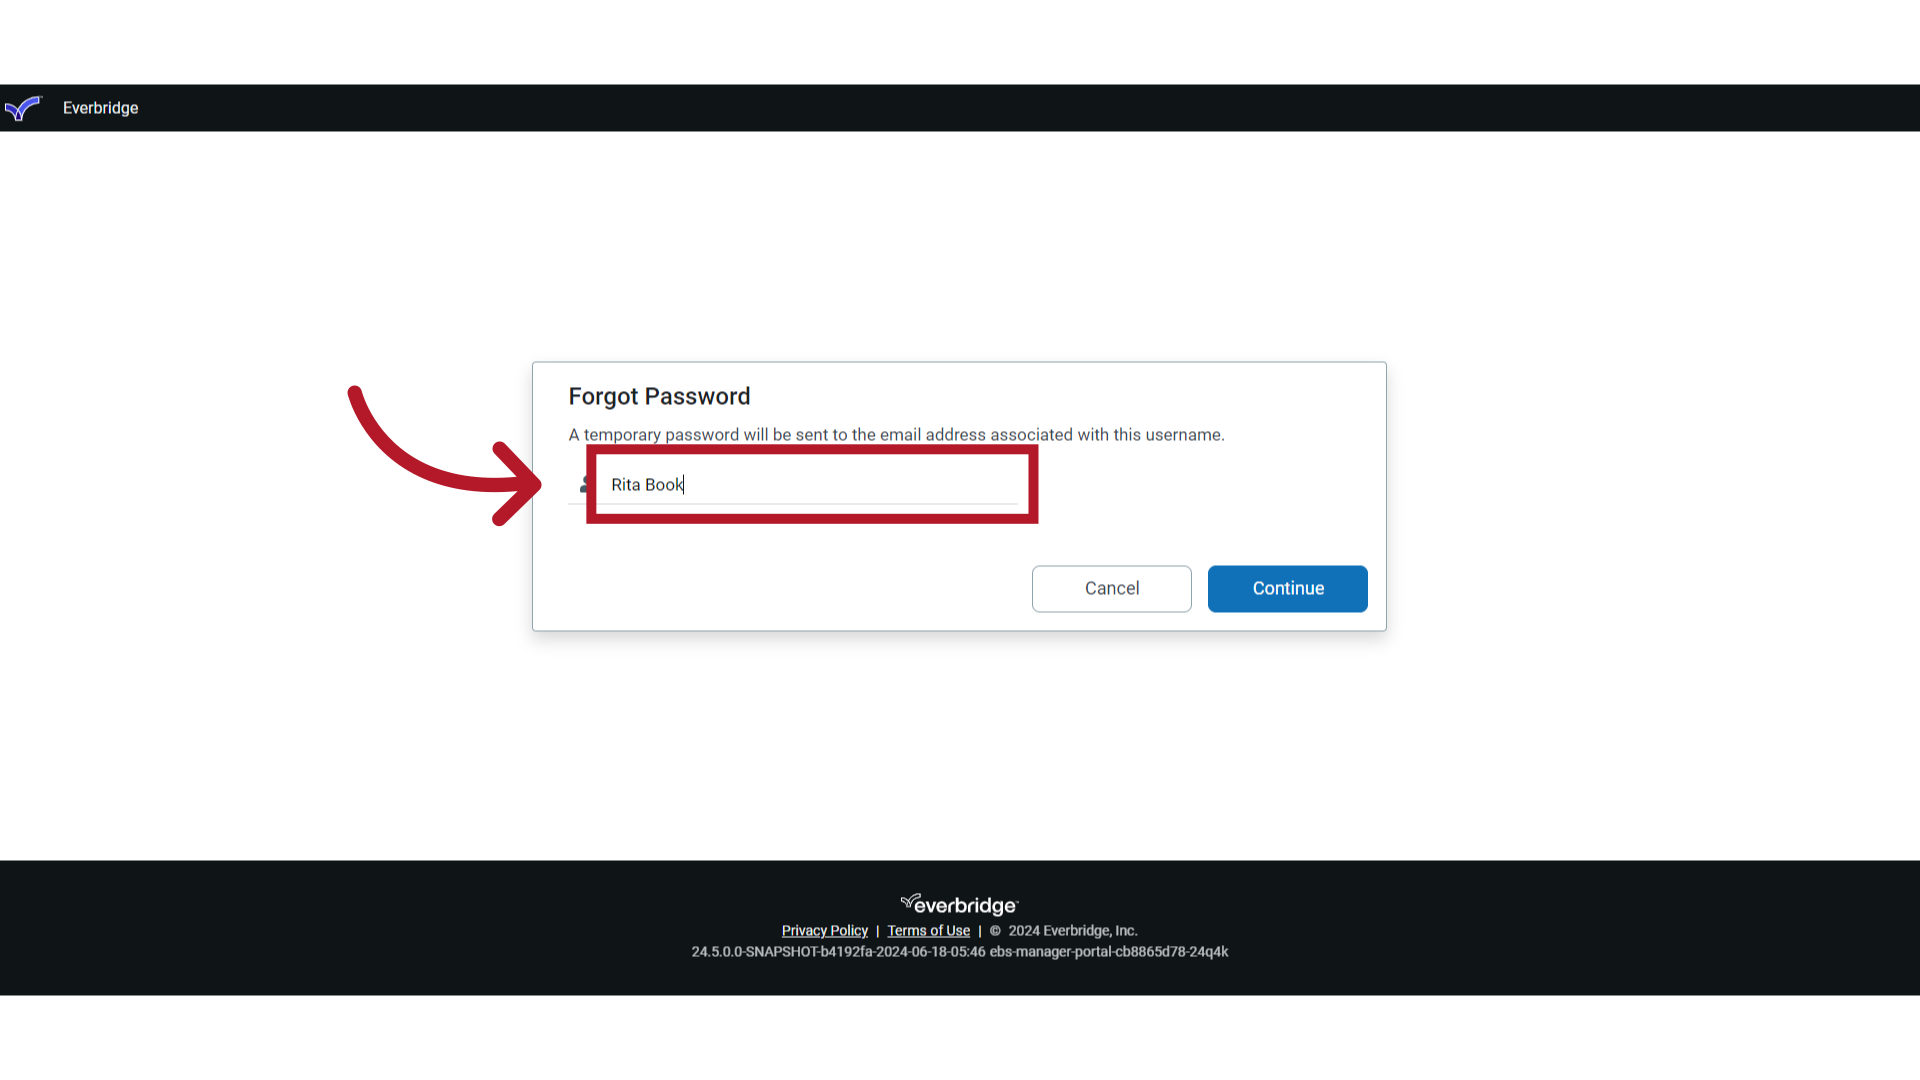
5. Enter Username
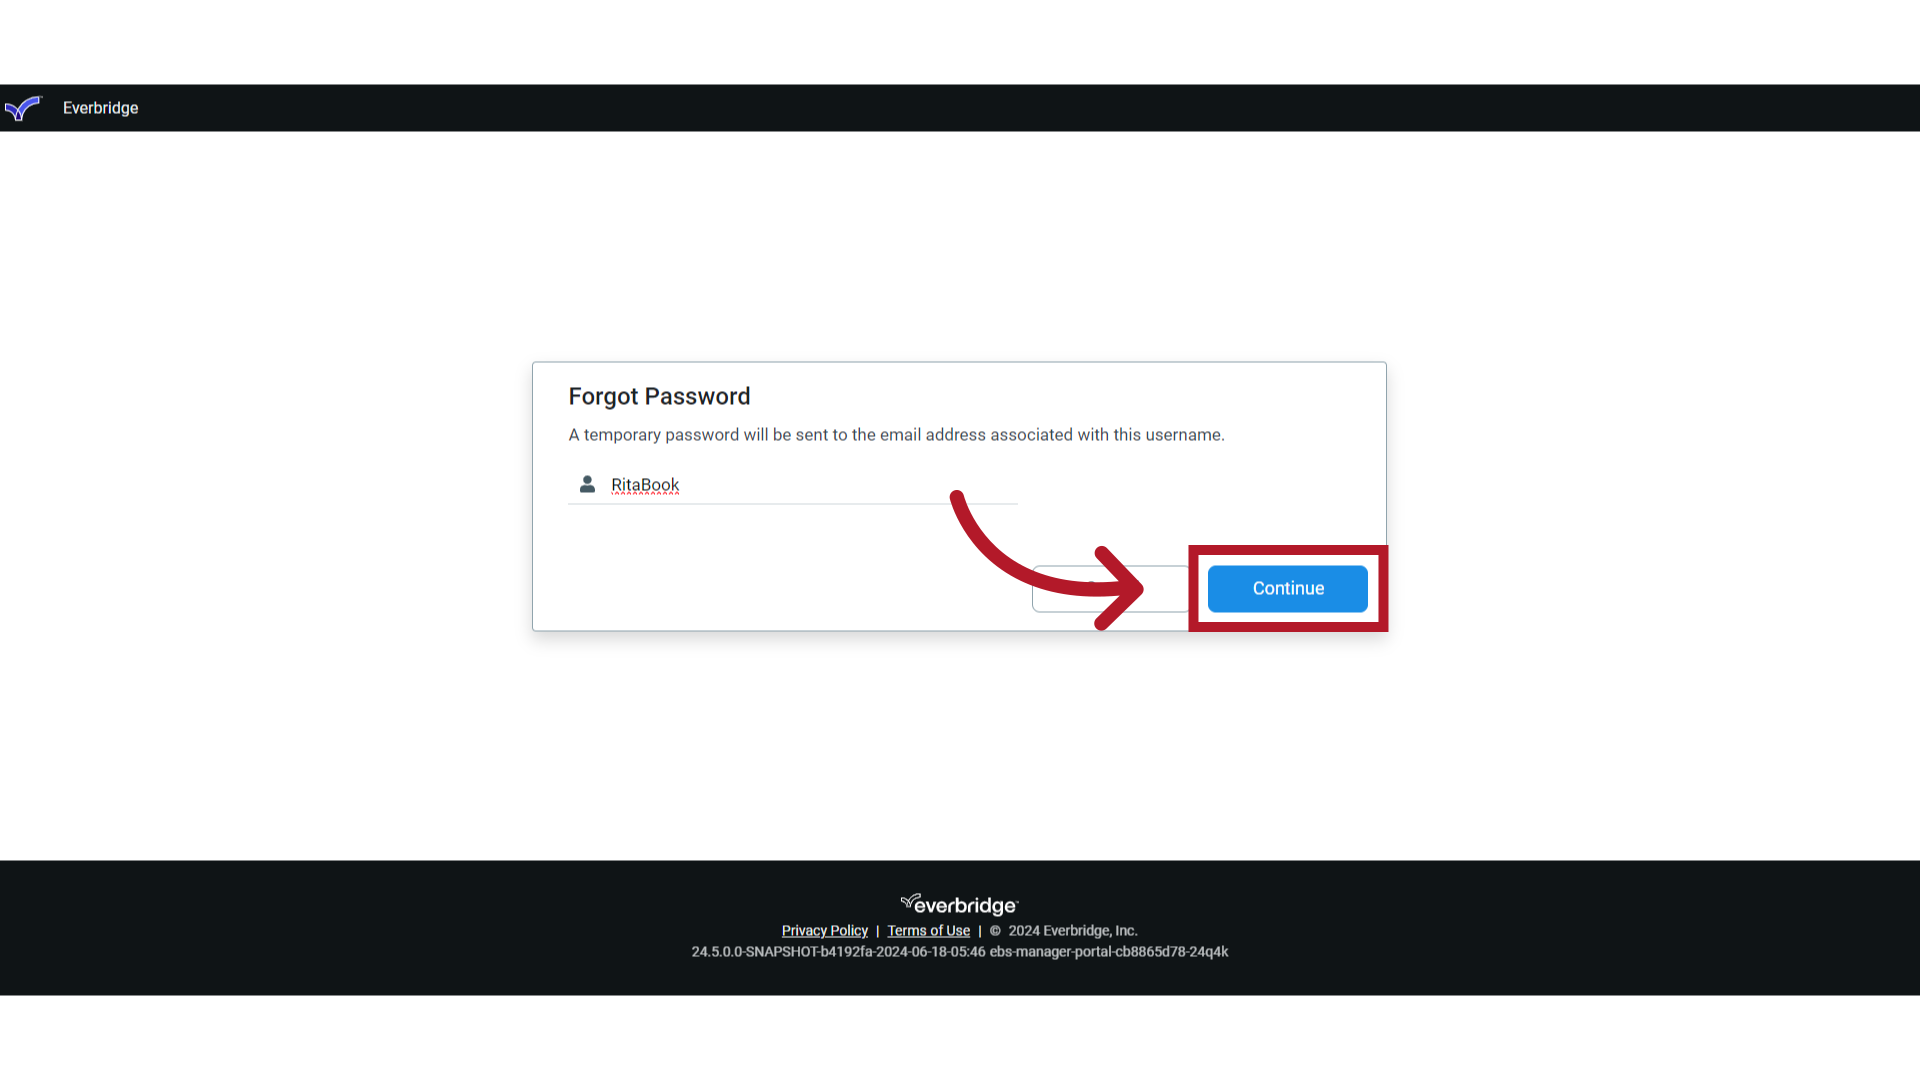
Enter your username in the USERNAME field. A temporary password will be sent to the email address associated with this username. Note that usernames are case sensitive.
6. Continue
Click "Continue."
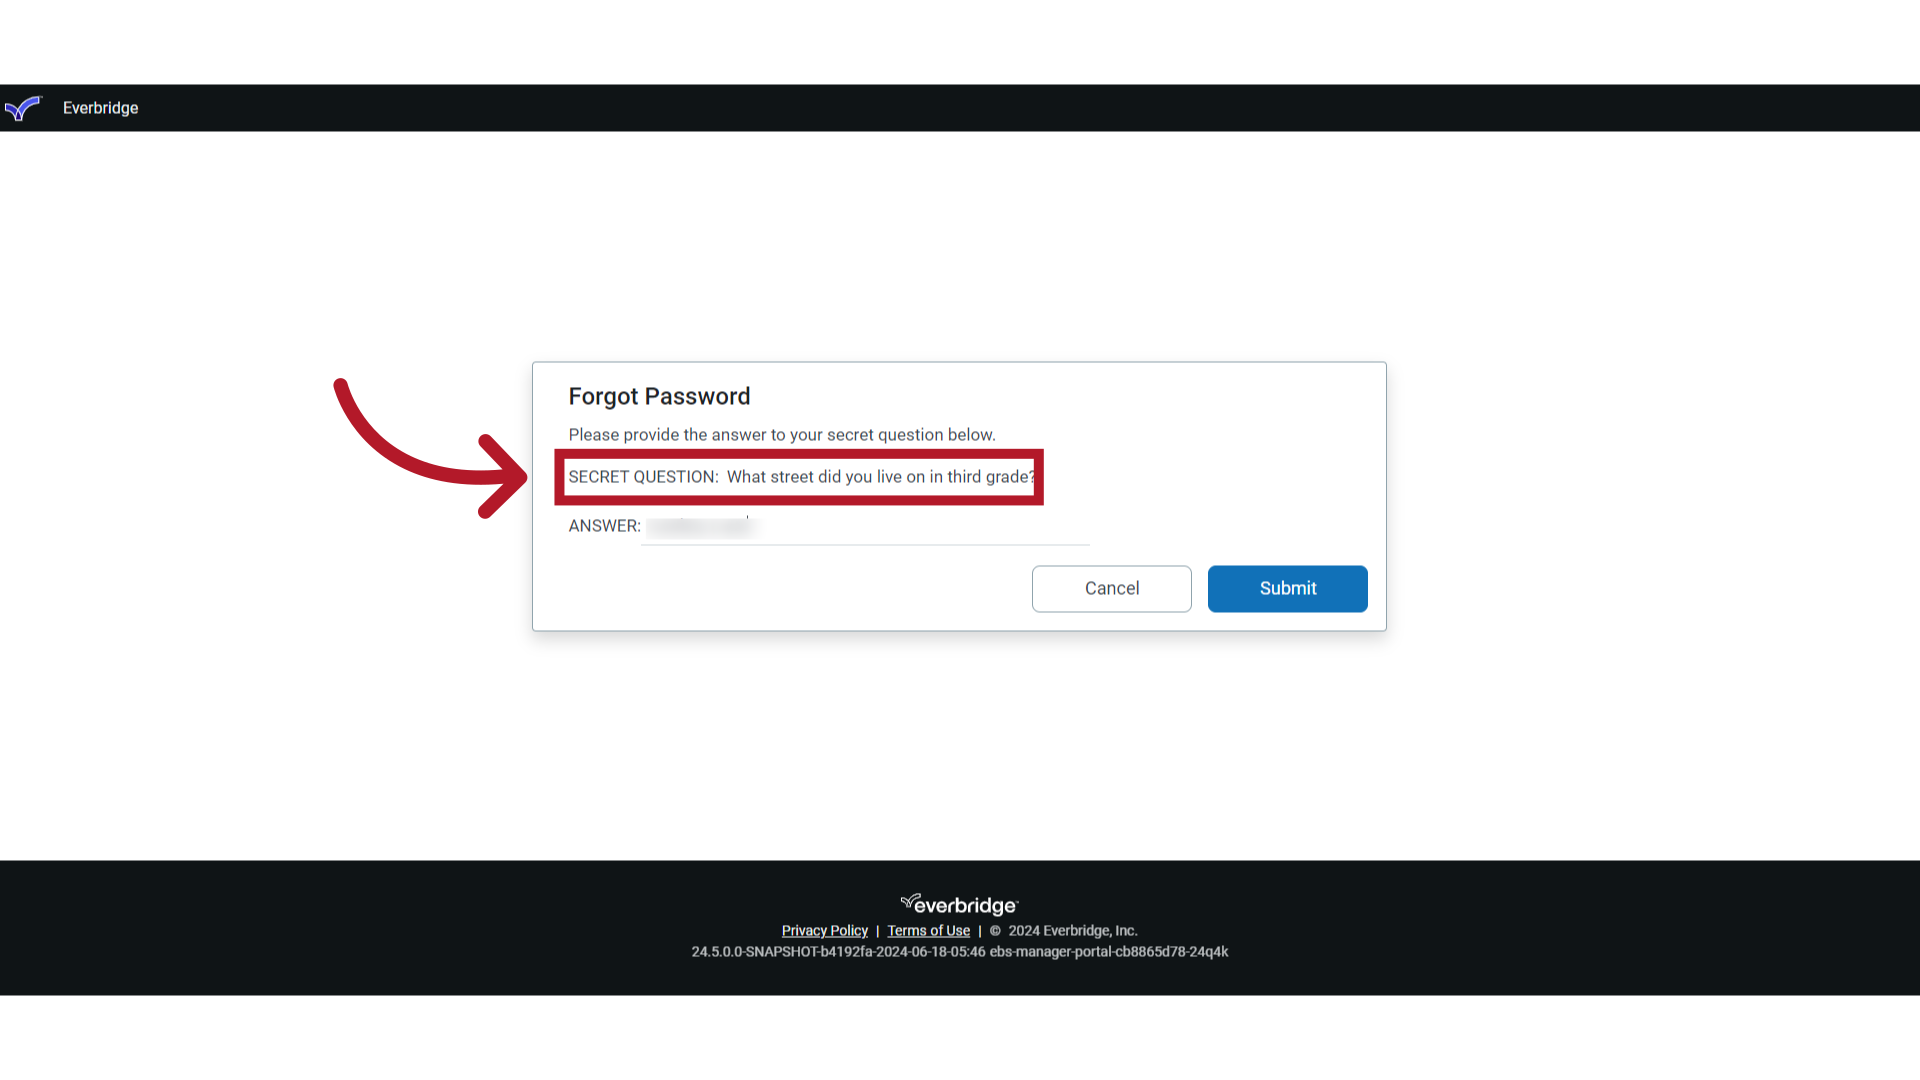
7. SECRET QUESTION
After you enter your username, you will be prompted to answer your SECRET QUESTION. This is the question that you chose when you registered your account. Note the answer to the secret question is case sensitive and must exactly match the answer in the system.
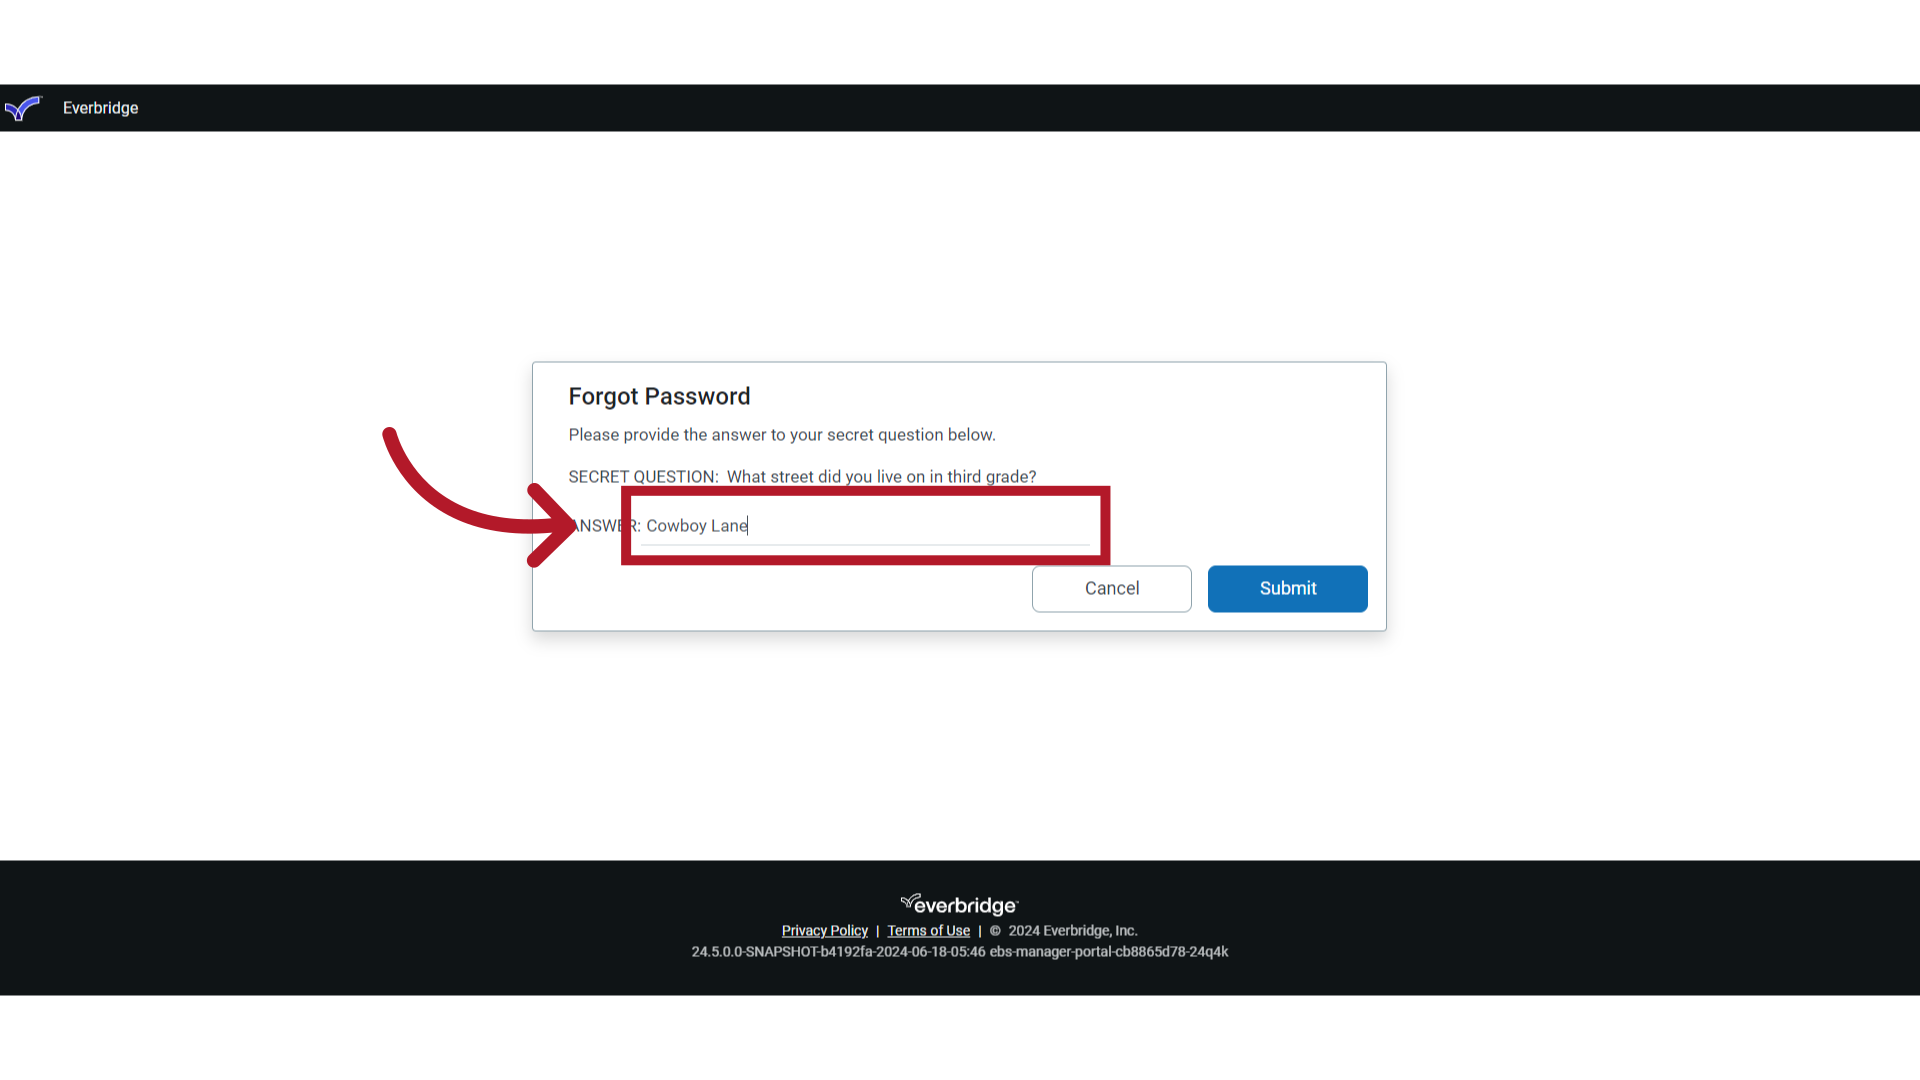
8. Secret Question Answer
Enter the answer to your secret question. Note: If you don’t know your security answer, follow this instruction: EBS: Changing a User's Security Question and Answer in Everbridge Suite
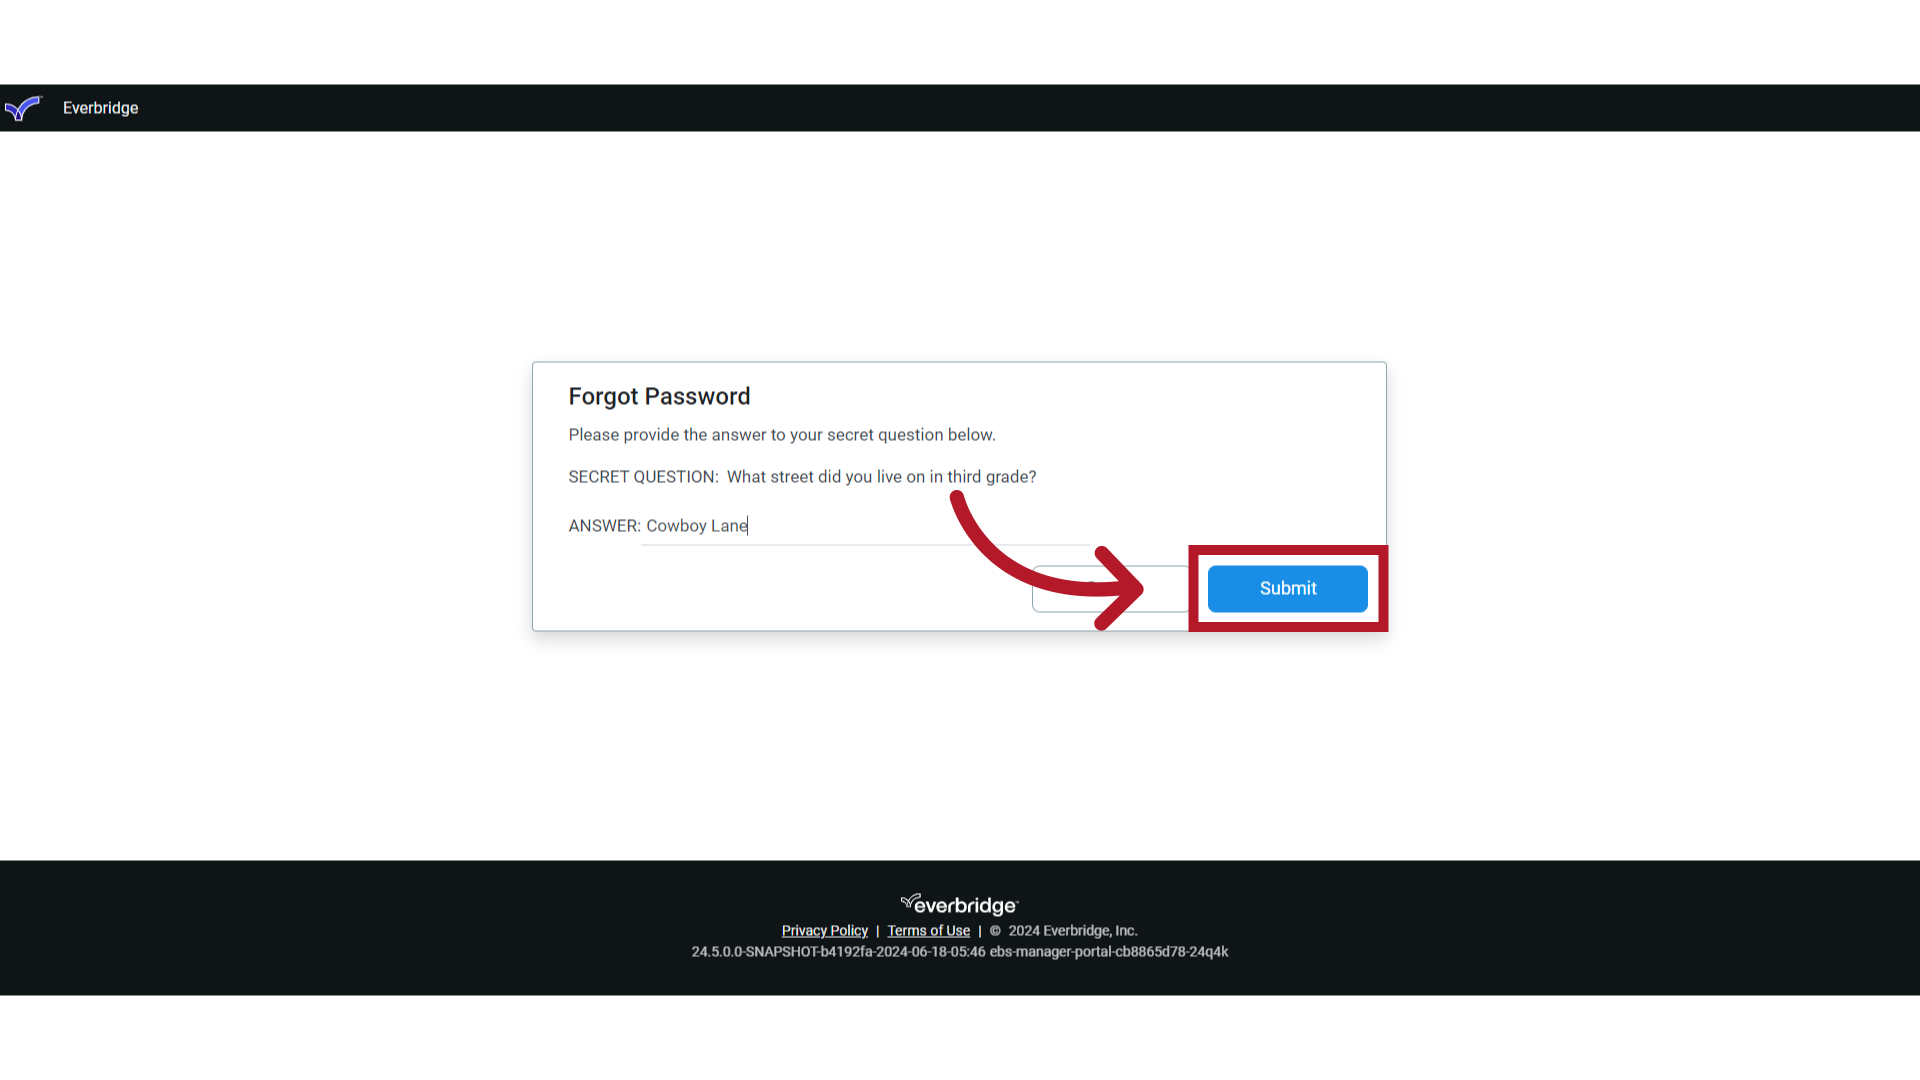
9. Submit
Click "Submit." If you entered the correct username and answer to the security question, an email will be sent to you with a temporary password and a link to the Manager Portal.
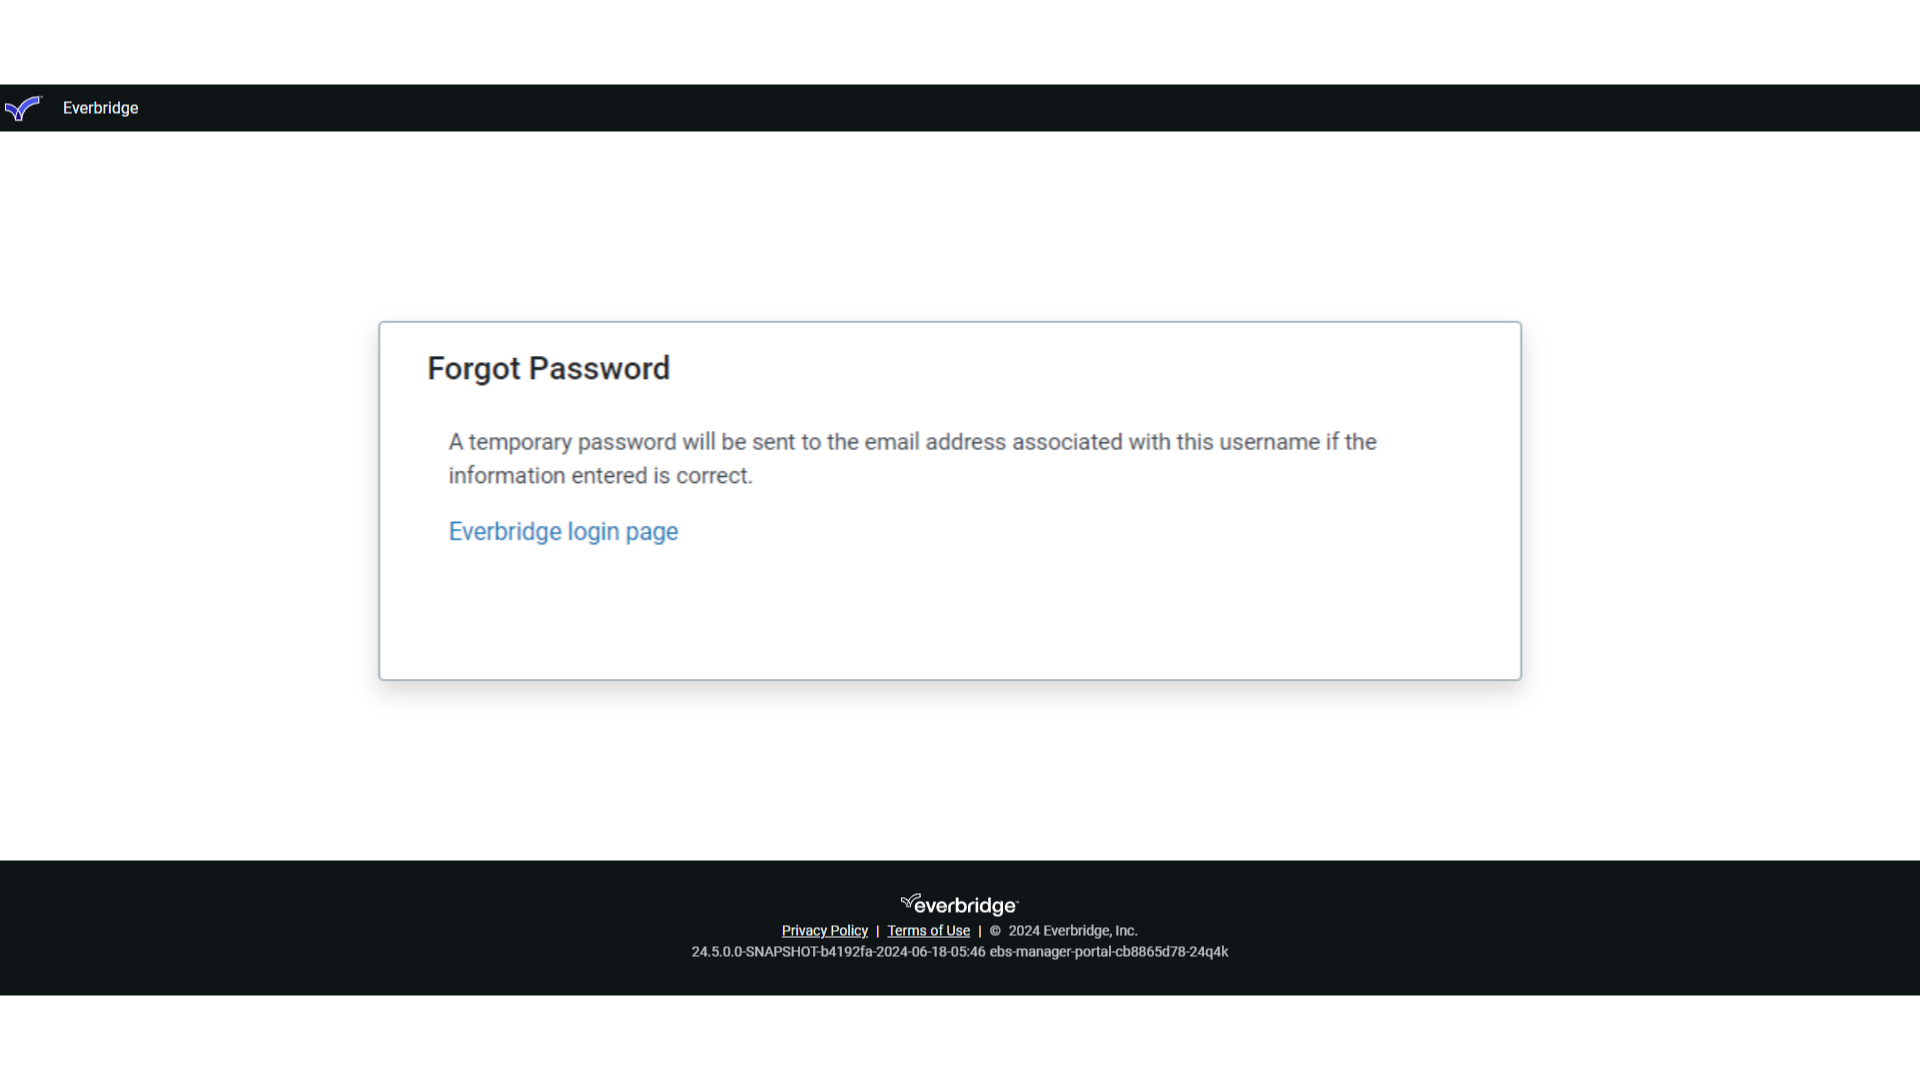
10. Everbridge login page
Check your email for the temporary password.
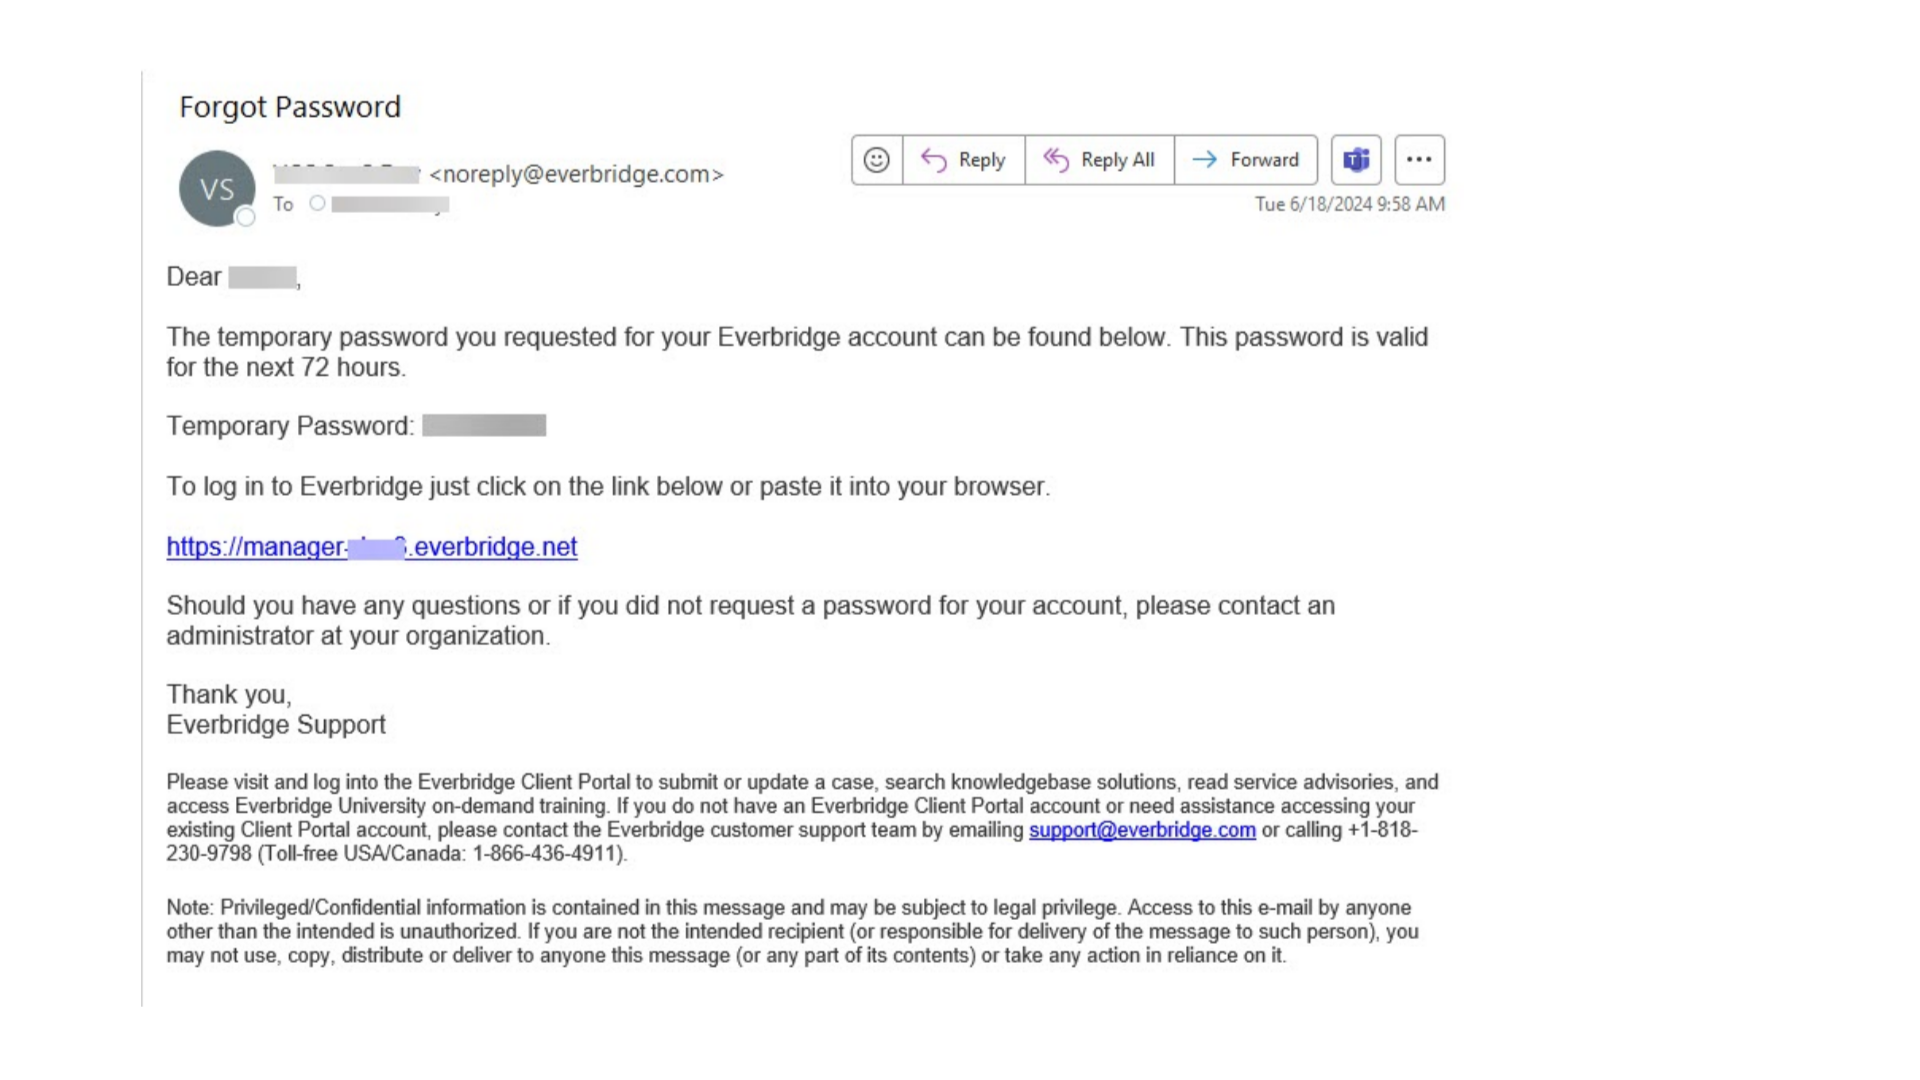
11. Ex email
Here is an example of the email you will receive if you have entered your information correctly. Note the "Temporary Password" and the link to the manager portal. You may log in to the manager portal using the link in the email or the link from the forgot password window.
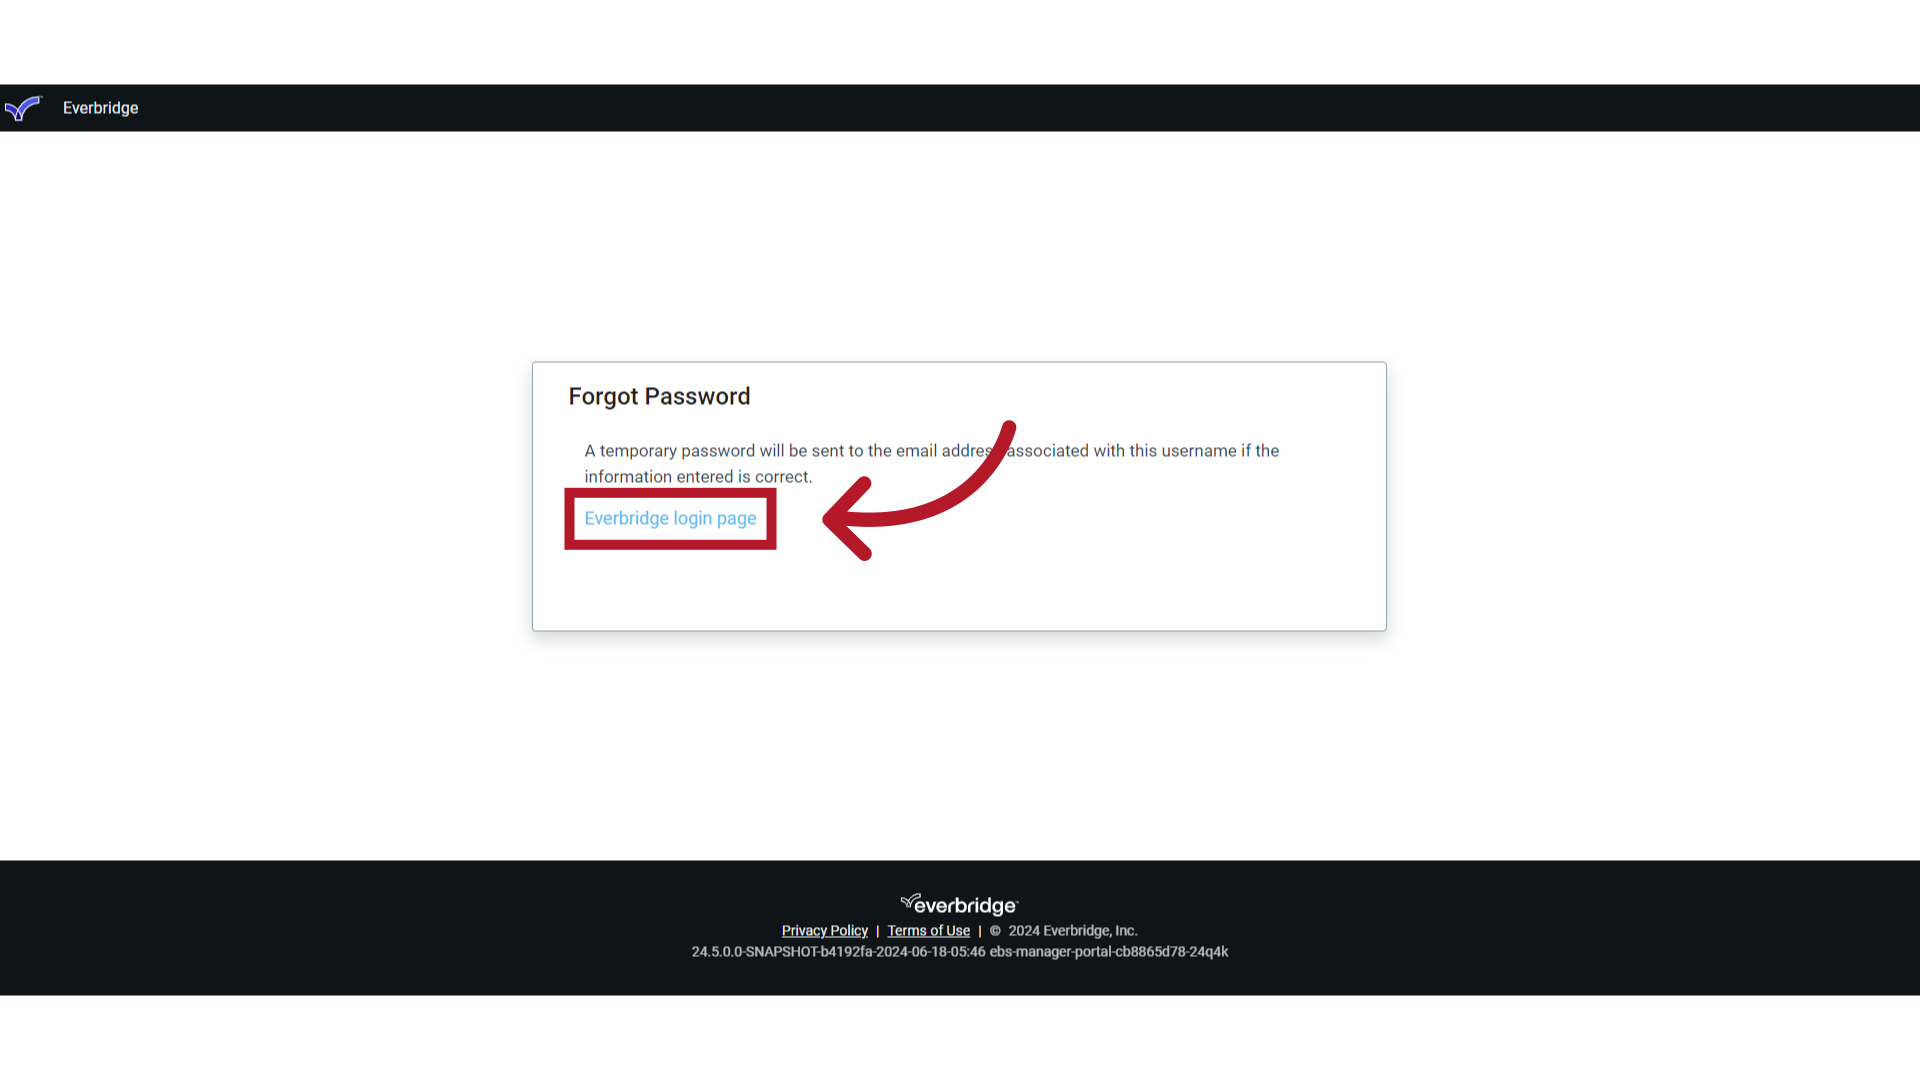
12. Log In
If you do not use the manager portal link in the email, return to the "Forgot Password" window and click on the "Everbridge login page" hyperlink to log in to the Manager Portal using your temporary password.
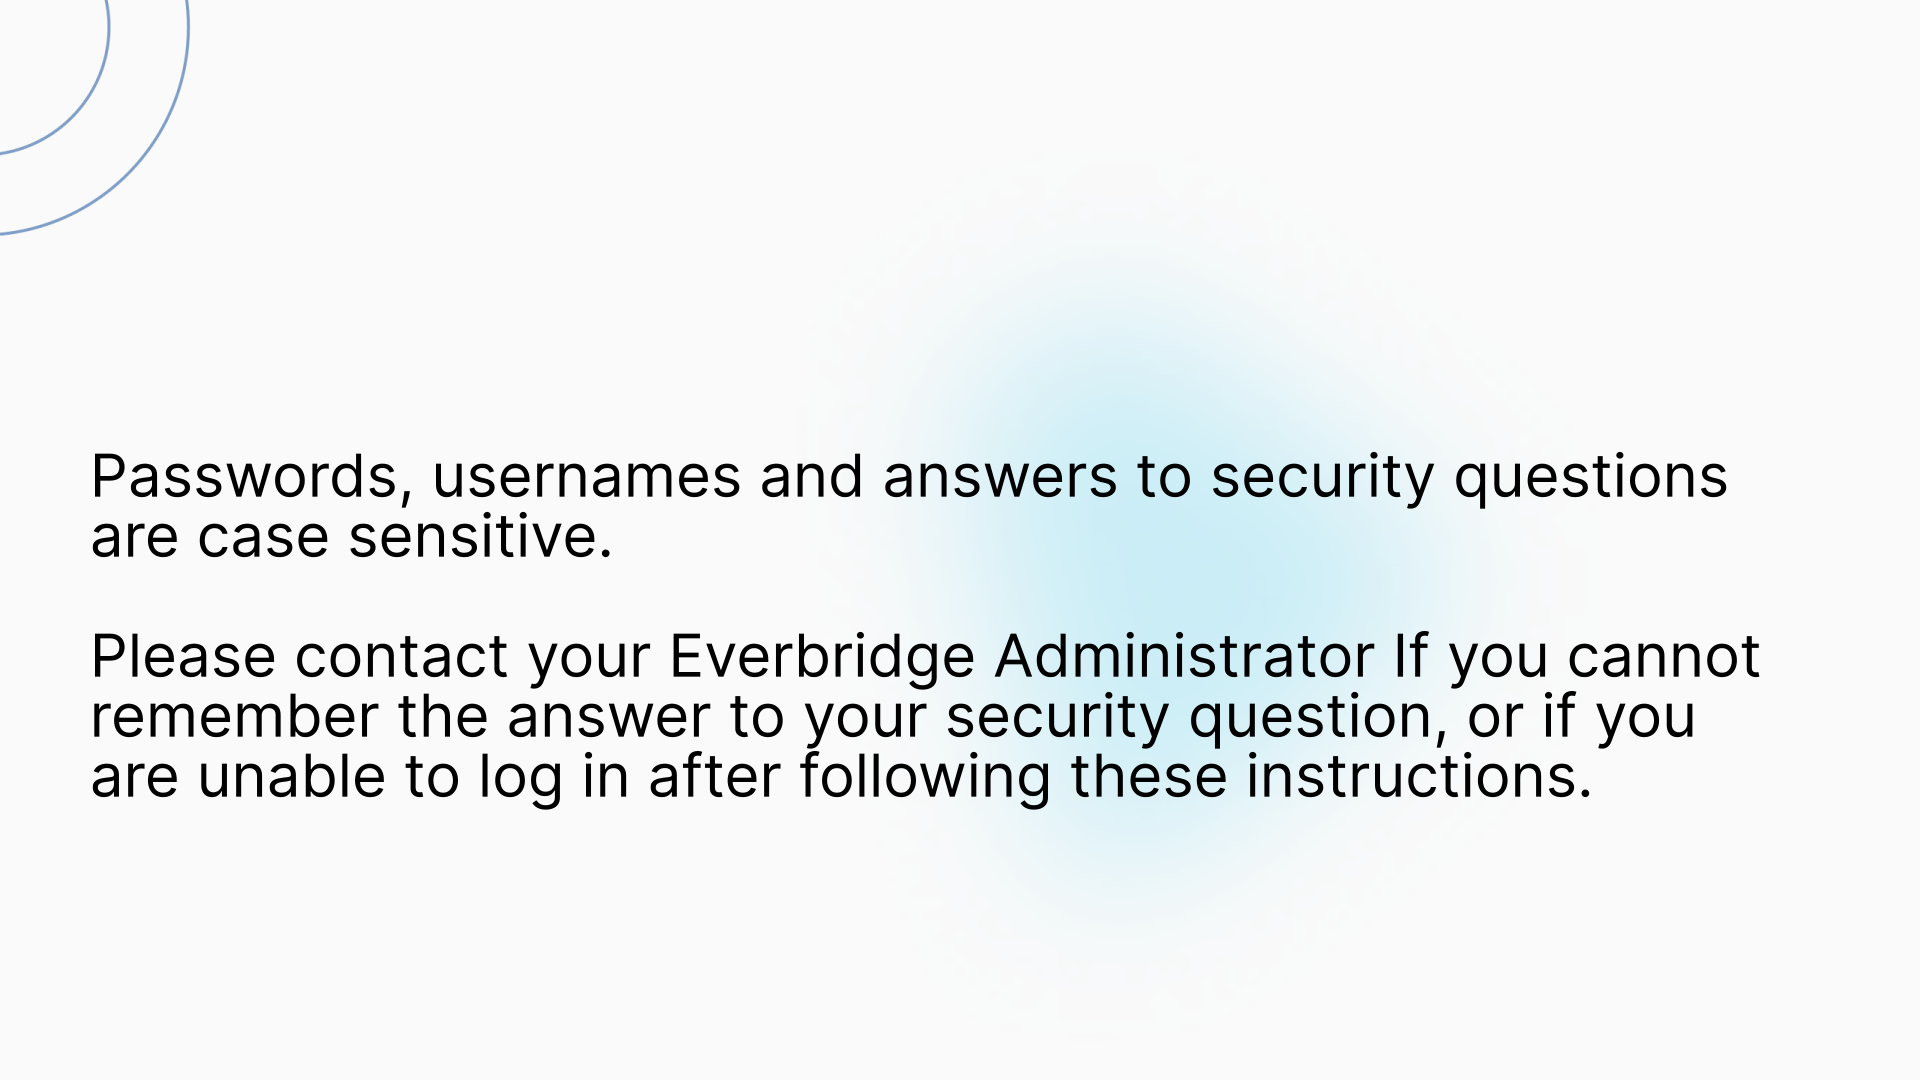
13. Notes
Important Notes: Passwords, usernames and answers to secret questions are case sensitive. If you cannot remember the answer to your security question, contact your Account Administrator, Organization Administrator, or internal Corp IT team. They can bypass the security question requirement and reset your password directly. Once you regain access to your account, you can update your security questions and answers in your profile.
14. Recap
In this guide you learned how to recover your Everbridge Manager Portal password.

15. HELP & SUPPORT
Access the Everbridge Support Center from the top-right corner of the Manager Portal for more microlearning, release notes, documentation, knowledge articles, Everbridge University training, community Q&A and ideas, security bulletins, service advisories, system status, and for submitting and managing your support tickets.
Thank you for watching.
-